Crispy on the outside, creamy on the inside — these Mashed Potato Spring Rolls are the ultimate fusion snack. A golden, crunchy treat that transforms leftover mash into something truly irresistible.
If you’re looking for a creative appetizer that doubles down on using leftover mashed potatoes, then you’ve come to the right place! Over the years of creating holiday appetizer recipes, I’ve realized how versatile mashed potatoes can be to refresh them into something entirely new and delicious! For instance, I have my Leftover Mashed Potato Samosas and myLeftover Mashed Potato Crescent Roll Pinwheels. Now here we are with these spring rolls filled with mashed potatoes!
I’ll make a confession and tell you that I’ve always wanted to try these out at home, but it’s taken forever for me to get around to it! I actually used to work at a JOEY Restaurant location for a couple of years, and I’ve made these mashed potato spring rolls a number of times before. While my main role was to make sushi (especially sushi cones!), on occasion I’ve worked both at the assembly station and on the frying station. It’s so cool to do it professionally! Well, with all these years that have passed, I’m finally checking off making my own crispy potato spring rolls off my bucket list! If you’ve always wanted to recreate this restaurant favorite, then I encourage you to try this recipe out as part of your Live to Cook one-month challenge! The holidays is the best time to get out of your comfort zone in the kitchen and try some new creations, so be sure to get started today by signing up to my email newsletter, plus you’ll get all of my latest recipes sent straight to your inbox!
I know deep frying can be a bit intimidating to some folks, and perhaps this presentation really seems like it’s a lot of work! Don’t worry, I will walk you through every step of the way for these mashed potato spring rolls! Plus, I really encourage you to watch the video to follow along with the step by step tutorial so you make this epic dish and impress your guests this holiday! If you’re not already, I’d appreciate it if you subscribe to my YouTube channel and hit the bell button so you receive all of the notifications when a new video recipe goes live to help you on the way to success! Let’s get cooking!
Why You’ll Love This Mashed Potato Spring Rolls Recipe!
Great use of leftovers: If you’ve got leftover mashed potatoes, then don’t fear! Leftovers don’t have to be boring, and they can be transformed into a delicious creation, as we’ll be doing here! Having leftover mashed potatoes actually saves a bunch of time with this recipe, too! If you’ve already got your potatoes, then it’s a matter of assembling and frying.
Fancy presentation: This was a really hot item at the restaurant, and everyone loves how unique these spring rolls are - not just in flavor, but in appearance! After all, as I always say, we definitely do eat with our eyes! Of course you could just skip the plating altogether and just dig into the spring rolls, but what fun is that, especially if you’re going to make this for the holidays!
Fun to make: I really enjoy the process of making these spring rolls! Although there is definitely some technique and practice required not just for the assembly but for deep frying and to serve, it’s a great learning process to replicate this restaurant favorite and to truly impress your guests!
Perfect for a crowd: This was a really hot item at the restaurant, and if you try this at home, I’m sure these spring rolls will fly off the table! What’s not to love? Crispy spring rolls on the outside with a warm and creamy mashed potato filling inside, topped with cheddar, bacon and sour cream. This treat sure is a flavor explosion that will have everyone coming back for a second or third!
Customizable: There are plenty of ways to transform your dish into your very own! Read on for plenty of variation ideas to this base recipe.
Tips & Tricks for Amazing Potato Spring Rolls!
Let your mashed potatoes cool completely before rolling to avoid soggy wrappers. Stick to ~2 tablespoons of filling per roll — overstuffing makes them hard to seal and prone to bursting.
Wrappers dry out fast; folding while still pliable helps them stay intact. To help prevent this cover any extra wrappers with a damp kitchen towel.
When folding, think of it like tucking in a sleeping bag: bottom, sides, then top, sealing with a bit of flour paste.
Gently press around the filling before folding so trapped air doesn’t expand while frying.
Too much filling increases the chance of bursting.
Fry at 350–365°F for a golden, crisp shell without greasy potatoes.
Finally, top with sour cream, cheddar, bacon, and green onions — it’s the little touches that make these spring rolls unforgettable. To go any extra mile, follow my instructions to plate and serve.
You can find the full list of ingredients and their measurements in the FULL PRINTABLE RECIPE CARD by scrolling to the bottom of this post or by pressing the “Jump to Recipe” button. You can also use the recipe card to scale the recipe so you know how many spring rolls you can make based on the amount of mashed potatoes you’re working with! For more information on how to make the mashed potatoes, be sure to check out my Ultimate Creamy Mashed Potatoes recipe.
For the Mashed Potatoes
Yukon Gold or Yellow Potatoes: This is my preference of potatoes for mashed potatoes, but if you don’t have these, then you can use russet potatoes! In the batch I made here, I actually did use russet potatoes since it was a last minute idea! As I describe in my free motivational guide to explore your potential in the kitchen, Make Cooking Fun!!, you should use what you already have on hand before going out to buy something new, especially if it’s fresh produce! It was quite early in the morning when I made my mashed potatoes and I had a brand new bag of russet potatoes, so I figured I would just use them! Additionally, since I am going to be stuffing these mashed potatoes in a wrapper and not enjoying them plain, the slight difference it taste didn’t really matter so much.
Unsalted butter: Make sure it’s at room temperature.
Bacon: Bacon bits for garnish. You can cook the bacon however you’d like!
Green onions: Sliced at about a 60 to 70 degree angle. Of course this is optional and you could just chop your green onions, but slicing the green onions at this slanted angle really gives a more professional appearance!
Once the potatoes are cooked, peel and transfer them to a large bowl or the bowl of a stand mixer. Lightly mash, then add the butter and cream.
Use a hand mixer, a whisk, or the whisk attachment on a stand mixer and blend on low until smooth and creamy. When the potatoes reach the desired texture, season with salt and pepper. Increase to medium speed for a short time to whip in some air—this gives them a lighter, fluffier finish. Adjust seasoning as needed.
Let the mashed potatoes cool completely before using them in the spring rolls.
For the Glue (Flour Paste)
Whisk 1 Tbsp flour with enough water to create a thick, smooth paste that will help seal the wrappers.
To Prepare the Mashed Potato Spring Rolls
Separate 5–10 spring roll wrappers and keep the rest covered with a damp towel.
Working one wrapper at a time, rotate it so it forms a diamond shape. Place about 2 Tbsp of mashed potatoes across the center, running left to right.
Fold the bottom point over the filling and gently press to shape and release any air pockets. Fold in the left and right sides so it forms an envelope. Brush the top corner with the flour paste, then roll up tightly to seal.
Repeat until all the mashed potatoes are used.
To Cook the Spring Rolls
Heat oil to 350 - 365 F and fry the spring rolls for 5–7 minutes, or until golden and crisp.
To plate, use a large plate and arrange the spring rolls in a stacked or tiered pattern, using small dots of sour cream underneath to keep them in place. Add a small dab of sour cream between the layers so the rolls adhere neatly.
Using a squeeze bottle, drizzle sour cream across the top roll in a loose zigzag.
Finish with grated cheddar, bacon bits, and thinly sliced green onions scattered over the top.
Can I Bake or Air Fryer these Mashed Potato Spring Rolls?▼
If you’re wondering whether you can bake or air frythese mashed potato spring rolls, the short answer is yes — but with a few notes. Baking will give you a slightly softer and less crispy exterior compared to deep frying, so make sure to brush the rolls lightly with oil and bake at a high temperature, around 400°F, until golden brown.
Air frying is another option and can get you closer to that classic crispiness, but you’ll want to check the rolls halfway through to make sure they’re not drying out. If they are drying out, coat generously with oil and keep frying.
Either method works in a pinch, but for that perfect golden crunch, nothing beats a quick deep fry.
Can I make these Crispy Mashed Potato Spring Rolls Ahead of Time?▼
I do recommend that you enjoy these hot and fresh for the best experience! If you ended up making too much (which I don’t know how there could be leftovers, but that’s another story!), then don’t worry, though. You can definitely keep leftovers in the fridge and heat them later, as I’ll describe in the next sections.
However, you can definitely prep these in advance so you’re ready to fry. Once you have wrapped the spring rolls, you can store the spring rolls in a freezer safe container. Just arrange in the container and freeze. When you’re ready to cook, fry them straight from the freezer — no defrosting needed — for that perfect golden crisp.
Storing Leftover Spring Rolls
Simply store any extra spring rolls in an airtight container in the fridge. They will stay fresh in the fridge for 3-4 days.
I wouldn’t freeze these because if you defrost them, the pastry and the mashed potatoes will become mushy and lose their proper texture due to the condensation. Unfortunately, you can’t make these that far in advance, so plan accordingly!
How to Reheat▼
If you’re in a rush, the quickest way is the microwave — heat your spring rolls for 30 seconds to 1 minute, depending on your microwave’s strength, until both the outside and filling are warm.
For the best results and that crispy exterior we all love, I recommend using the air fryer or oven. In the air fryer, heat at 350°F for 3–4 minutes. In the oven, set it to 350°F and bake for 5–10 minutes until hot and golden.
In my opinion, the air fryer is the winner — no preheating, super convenient, and it brings back that perfect combination of a crispy outside with a piping-hot, fluffy mashed potato filling.
Let me know what you think of this recipe in the comments! If you’ve tried this recipe, be sure to post it on social media and tag it with #cookingwithanadi and mention me @cooking.with.anadi. Thank you!
Recipe by Anadi Misra
Super Crispy Mashed Potato Spring Rolls Recipe
Crispy on the outside, creamy on the inside — these Mashed Potato Spring Rolls are the ultimate fusion snack. A golden, crunchy treat that transforms leftover mash into something truly irresistible.
green onions(green parts only, cut in slices about 1½ inch in length)
Instructions
For the mashed potatoes
1
Once the potatoes are cooked, peel and transfer them to a large bowl or the bowl of a stand mixer. Lightly mash, then add the butter and cream.
Once the potatoes are cooked, peel and transfer them to a large bowl or the bowl of a stand mixer. Lightly mash, then add the butter and cream.
2
Use a hand mixer, a whisk, or the whisk attachment on a stand mixer and blend on low until smooth and creamy. When the potatoes reach the desired texture, season with salt and pepper. Increase to medium speed for a short time to whip in some air—this gives them a lighter, fluffier finish. Adjust seasoning as needed.
Use a hand mixer, a whisk, or the whisk attachment on a stand mixer and blend on low until smooth and creamy. When the potatoes reach the desired texture, season with salt and pepper. Increase to medium speed for a short time to whip in some air—this gives them a lighter, fluffier finish. Adjust seasoning as needed.
3
Let the mashed potatoes cool completely before using them in the spring rolls.
Let the mashed potatoes cool completely before using them in the spring rolls.
For the Glue (Flour Paste)
1
Whisk the flour with enough water to create a thick, smooth paste that will help seal the wrappers.
Whisk the flour with enough water to create a thick, smooth paste that will help seal the wrappers.
To prepare the Mashed Potato Spring Rolls
1
Separate a few spring roll wrappers and keep the rest covered with a damp towel.
Separate a few spring roll wrappers and keep the rest covered with a damp towel.
2
Working one wrapper at a time, rotate it so it forms a diamond shape. Place about 2 tbsp of mashed potatoes across the center, running left to right.
Working one wrapper at a time, rotate it so it forms a diamond shape. Place about 2 tbsp of mashed potatoes across the center, running left to right.
3
Fold the bottom point over the filling and gently press to shape and release any air pockets. Fold in the left and right sides so it forms an envelope. Brush the top corner with the flour paste, then roll up tightly to seal.
Fold the bottom point over the filling and gently press to shape and release any air pockets. Fold in the left and right sides so it forms an envelope. Brush the top corner with the flour paste, then roll up tightly to seal.
4
Repeat until all the mashed potatoes are used.
Repeat until all the mashed potatoes are used.
To cook and serve
1
Heat oil to 350–365°F and fry the spring rolls for 5–7 minutes, or until golden and crisp.
Heat oil to 350-365°F (177-185°C) and fry the spring rolls for 5–7 minutes, or until golden and crisp.
2
To plate, use a large plate and arrange the spring rolls in a stacked or tiered pattern, using small dots of sour cream underneath to keep them in place. Add a small dab of sour cream between the layers so the rolls adhere neatly.
To plate, use a large plate and arrange the spring rolls in a stacked or tiered pattern, using small dots of sour cream underneath to keep them in place. Add a small dab of sour cream between the layers so the rolls adhere neatly.
3
Using a squeeze bottle, drizzle sour cream across the top roll in a loose zigzag.
Using a squeeze bottle, drizzle sour cream across the top roll in a loose zigzag.
4
Finish with grated cheddar, bacon bits, and thinly sliced green onions scattered over the top.
Finish with grated cheddar, bacon bits, and thinly sliced green onions scattered over the top.
Nutrition per serving
136
Calories
3g
Protein
6g
Carbs
11g
Fat
1g
Fiber
1g
Sugar
208mg
Sodium
Share This Recipe
Did you make this recipe? Tag @cooking.with.anadi on Instagram and hashtag it #cookingwithanadi
Tested & written in Anadi’s kitchen
Free weekly newsletter
Cook something new every week
One tested recipe and a real weeknight tip from my kitchen, every Friday.
Join 40,000+ home cooks who visit Cooking With Anadi every month.
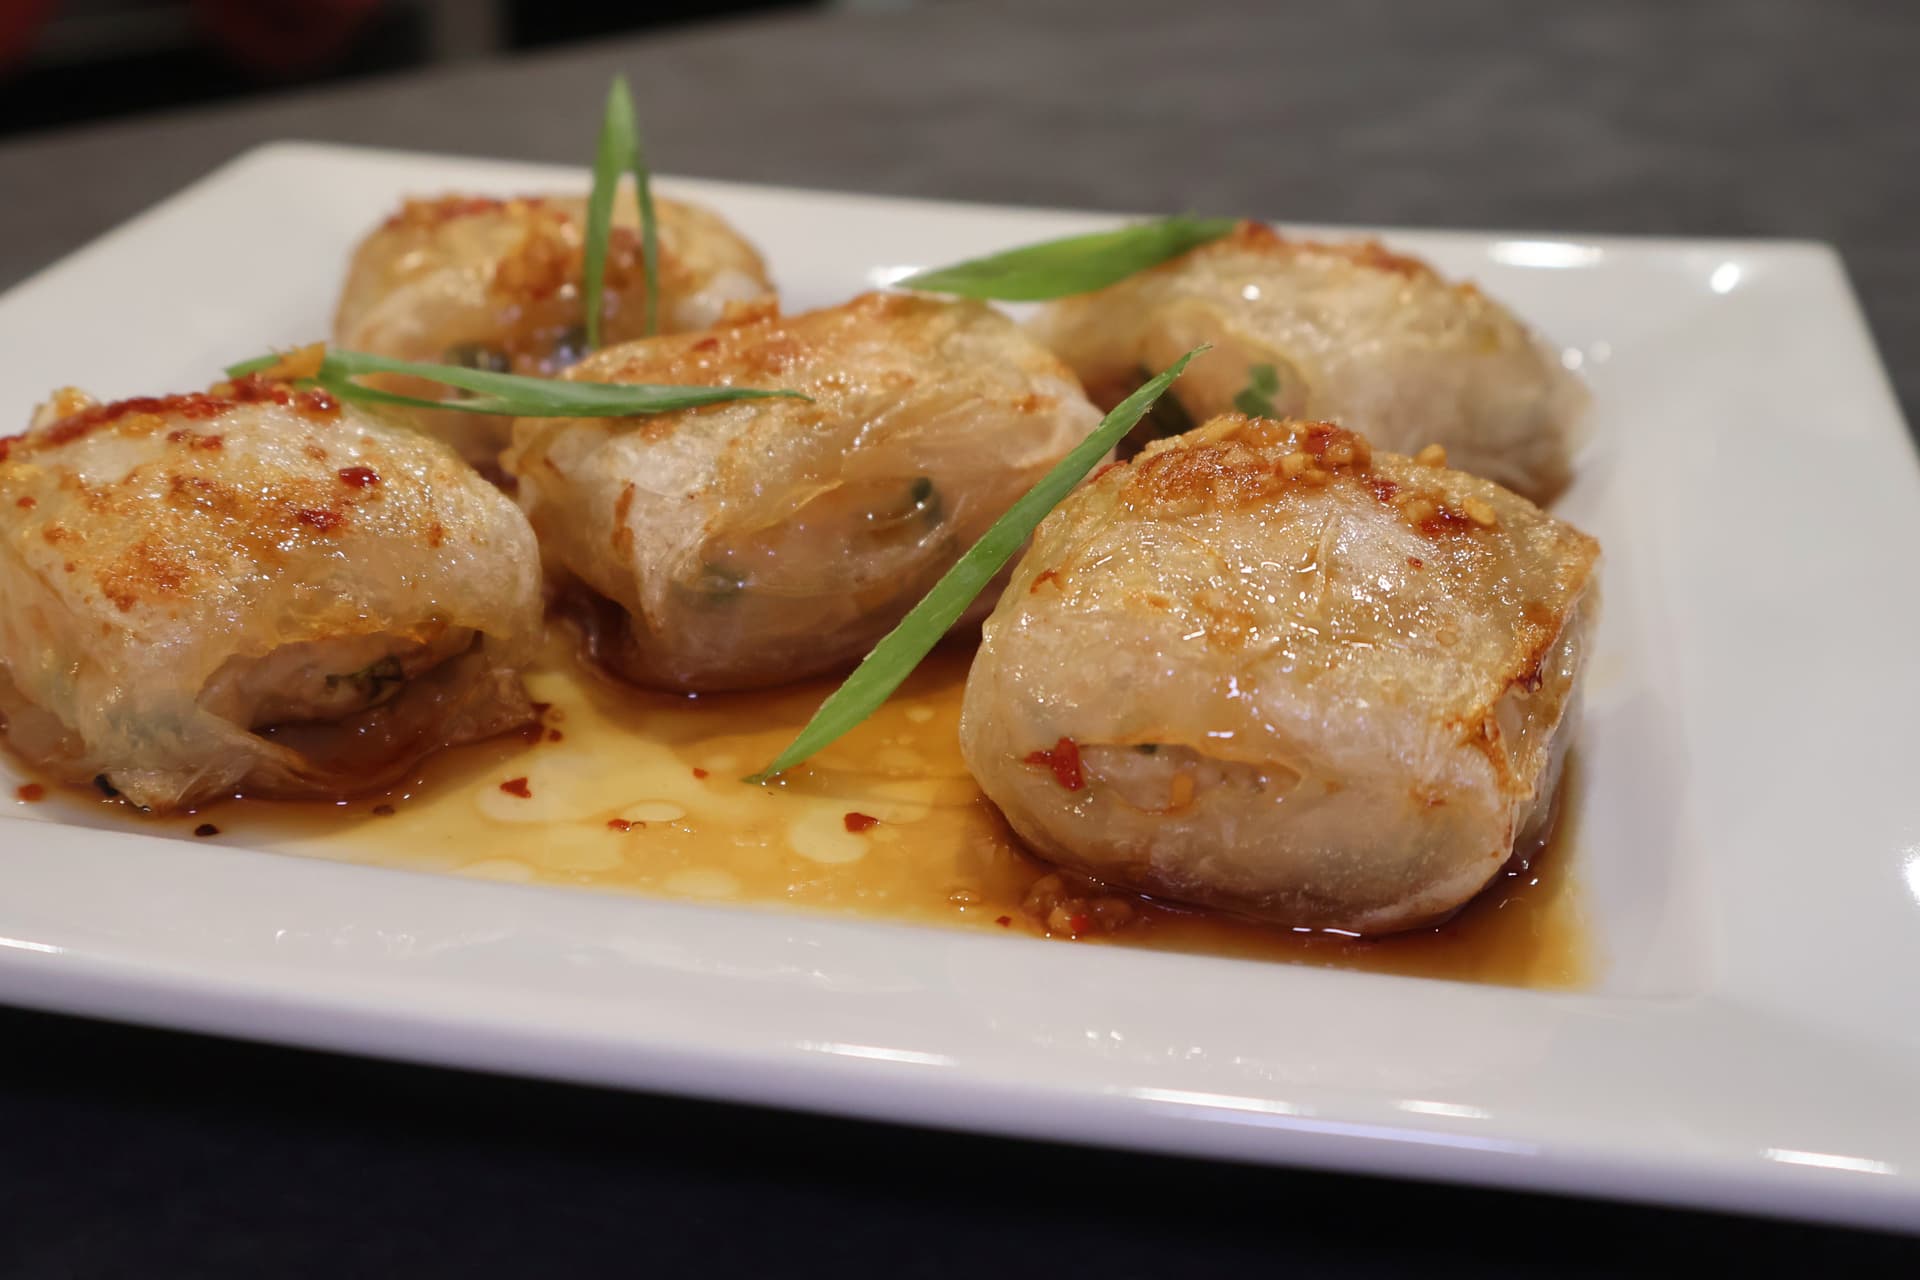
Crispy, golden air fryer rice paper chicken dumplings made quick and easy at home. A delicious starter or side dish the whole family will love. Ready in minutes!
35 minMedium8 dumplings
Recipe history
April 16, 2026 — Reworked and refreshed for the 2026 relaunch — new photography, restructured and standardized ingredients & instructions.
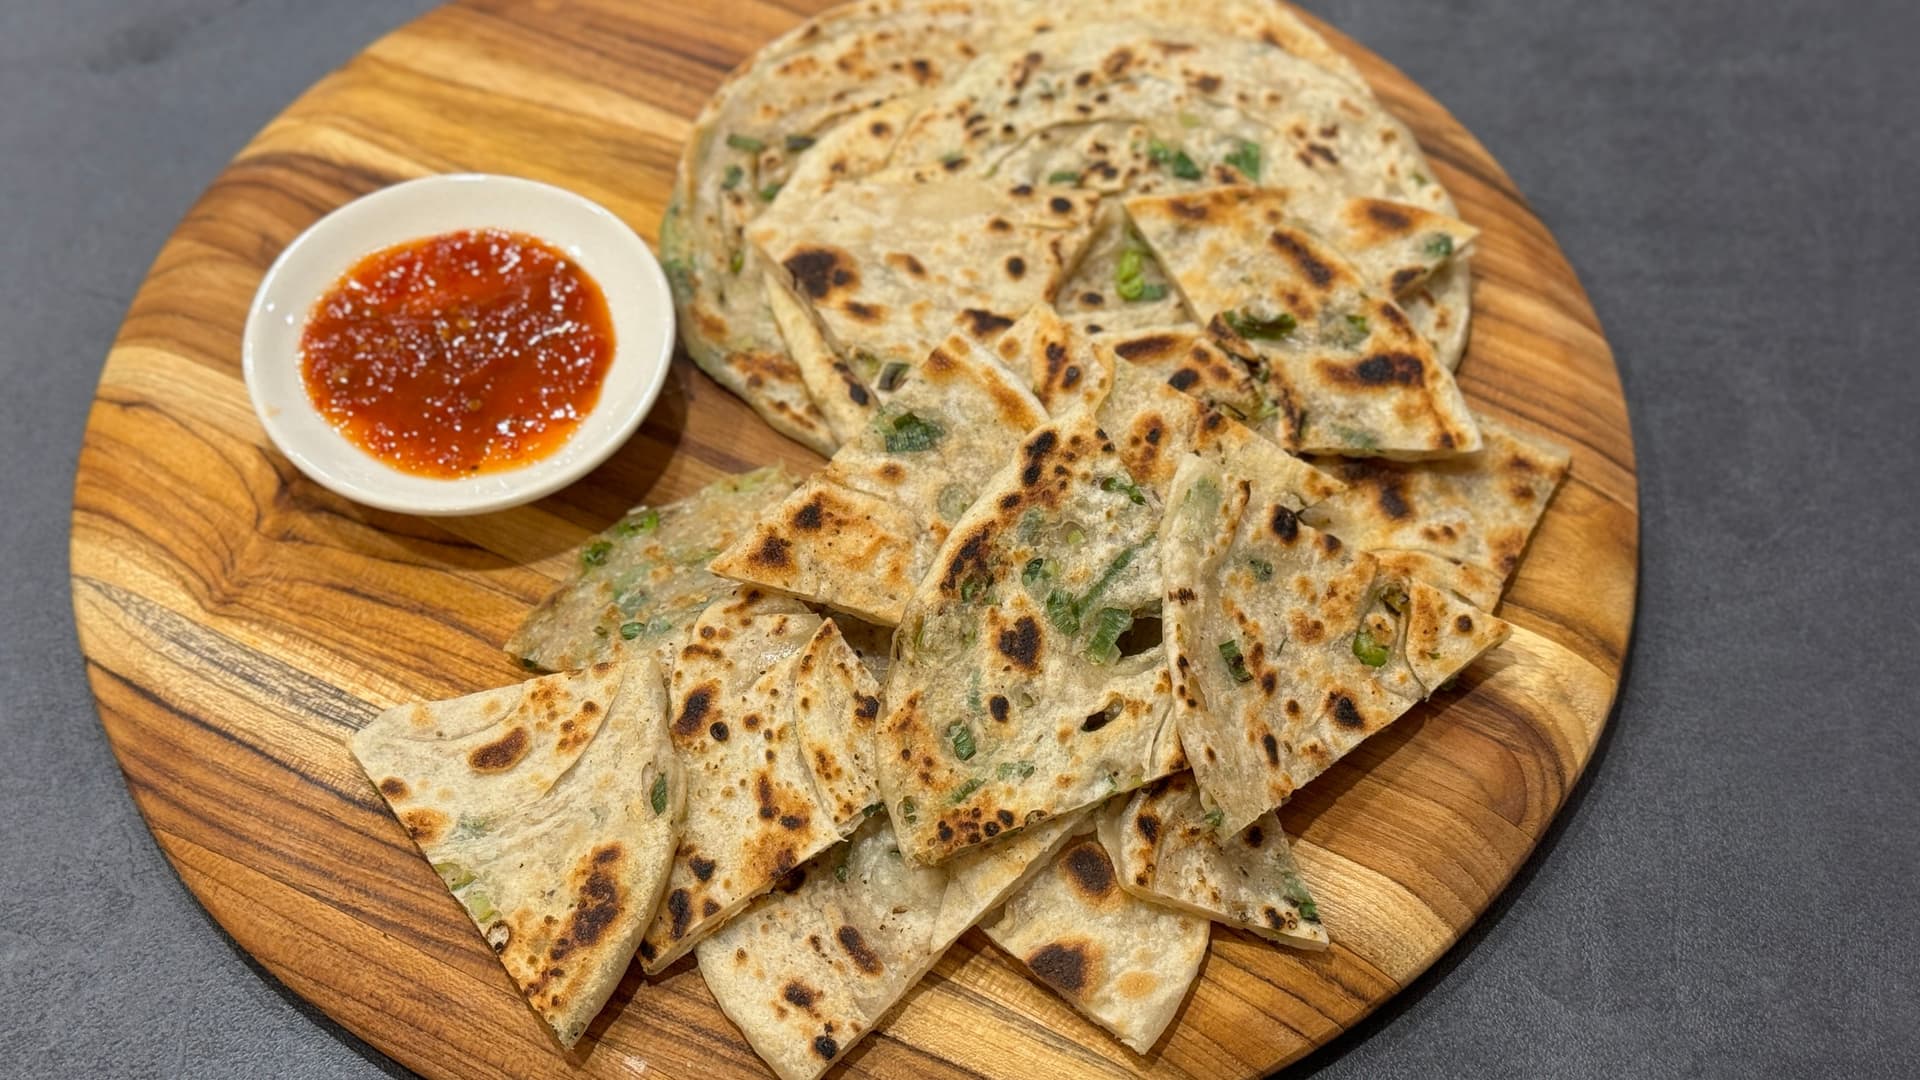
Crispy, flaky Chinese scallion pancakes made easy at home. This classic recipe delivers golden layers packed with savory green onion flavor — perfect as a breakfast or side dish.
Bold, flavorful Asian Fusion Chicken Tacos packed with crispy chicken, tangy slaw, and savory sauce. The perfect fusion dinner ready in under 30 minutes. Your new favorite taco night recipe.
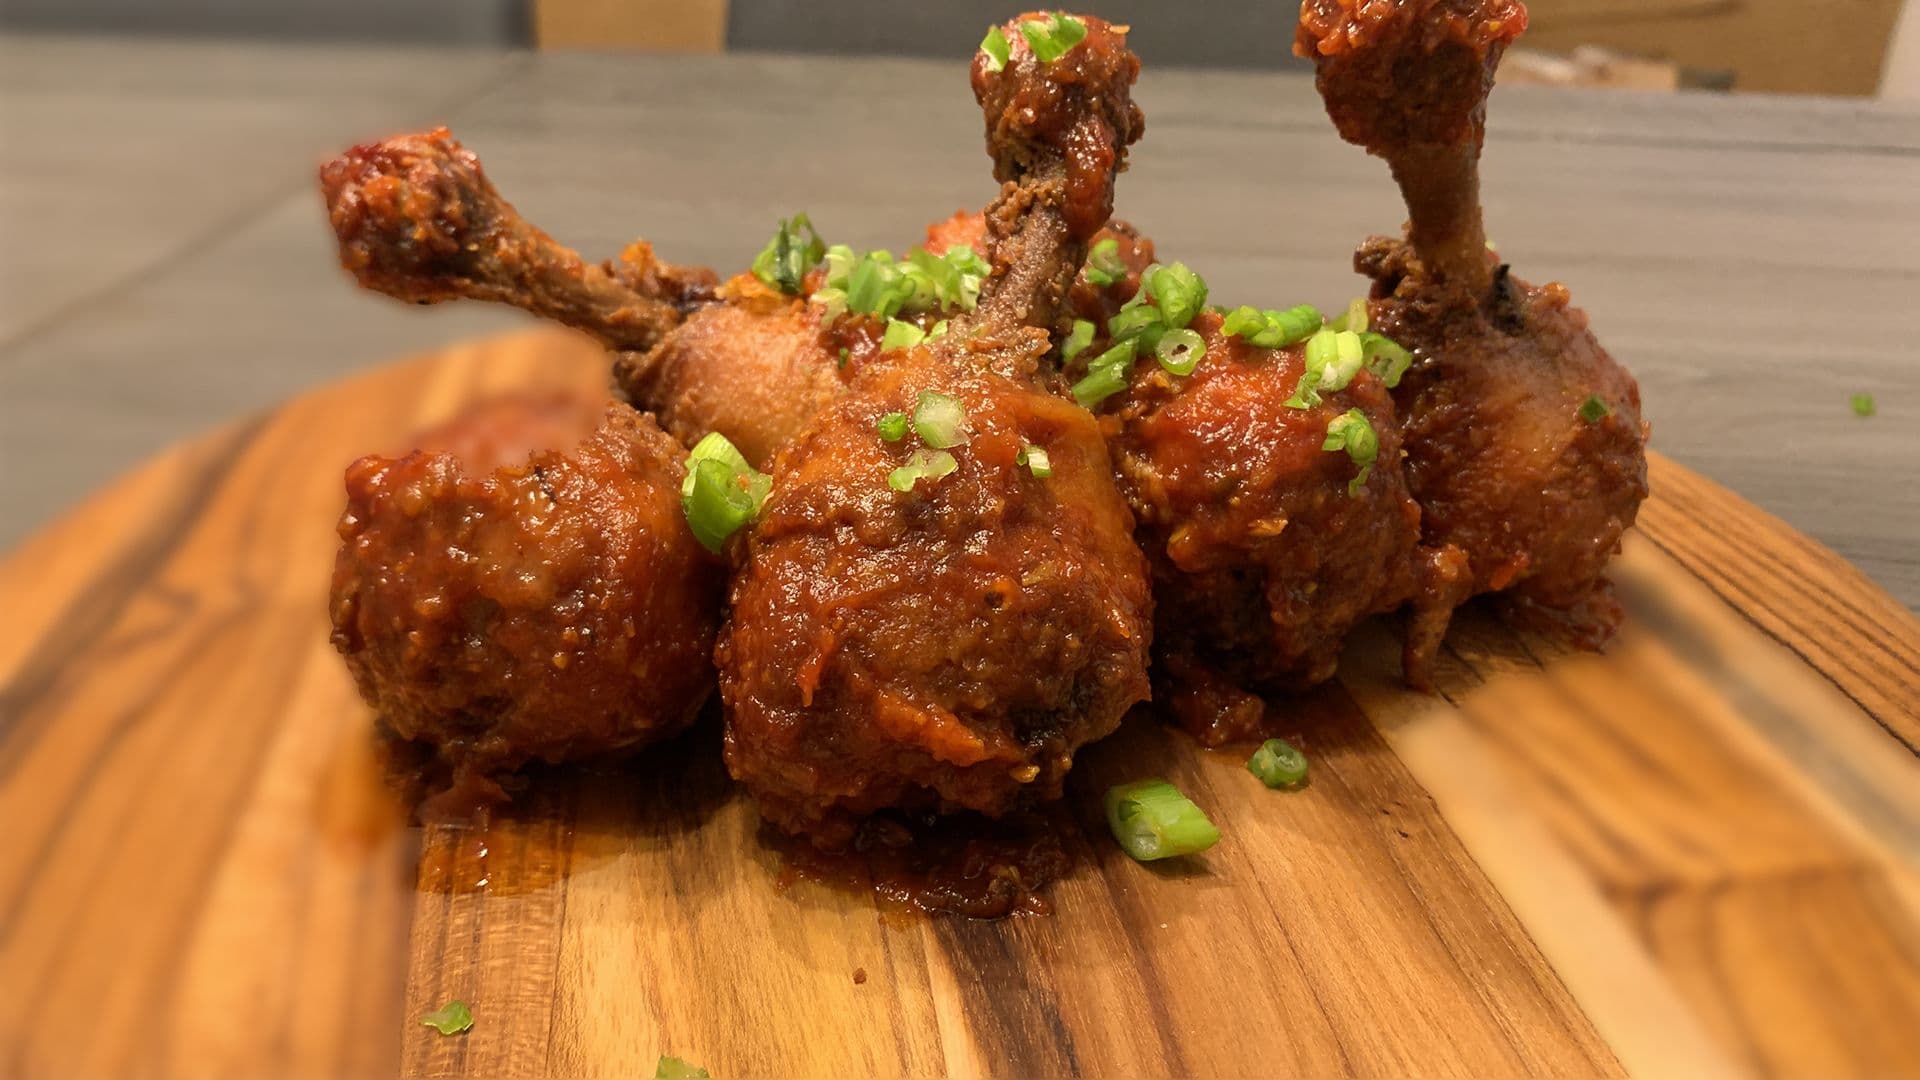
Crispy, saucy Indo-Chinese Chicken Lollipop Drumsticks — the ultimate party starter. Bold flavors, irresistible crunch. Your new favorite appetizer awaits.
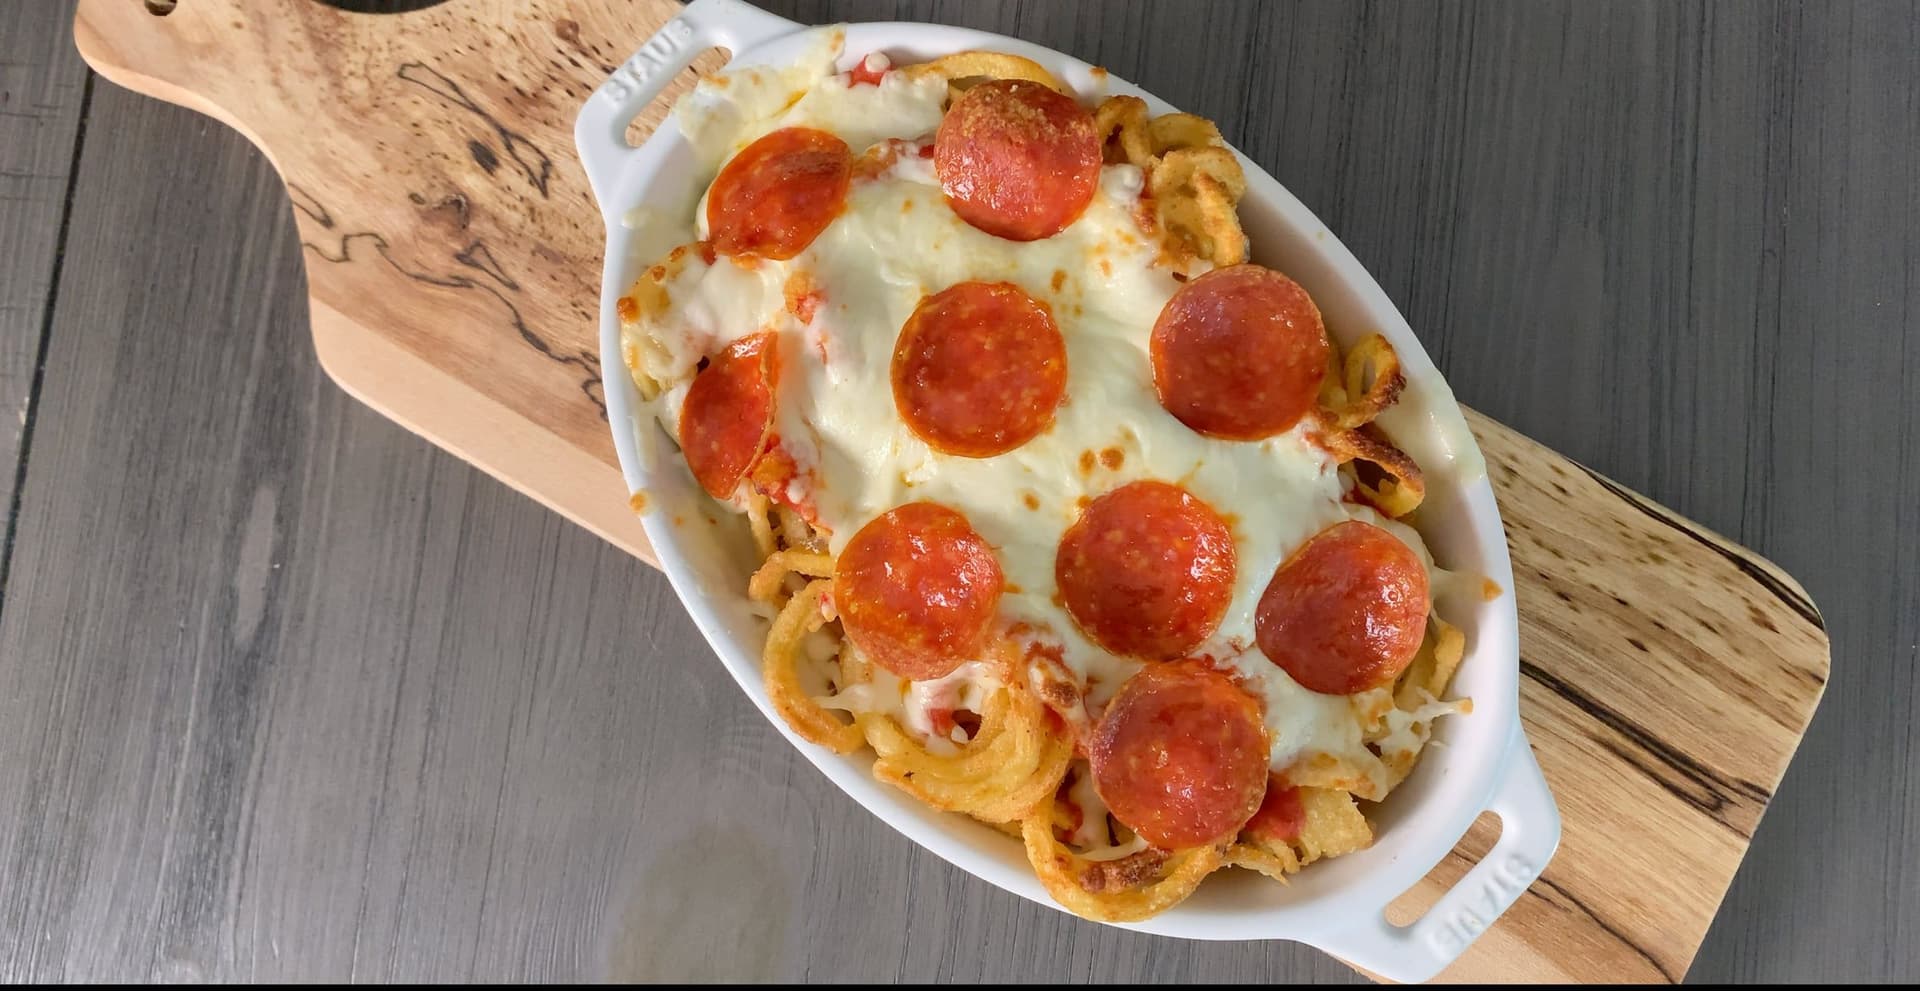
Crispy homemade curly fries loaded with melted cheese and pepperoni — these ultimate cheesy pizza fries are the perfect crowd-pleasing side or starter your whole family will love.
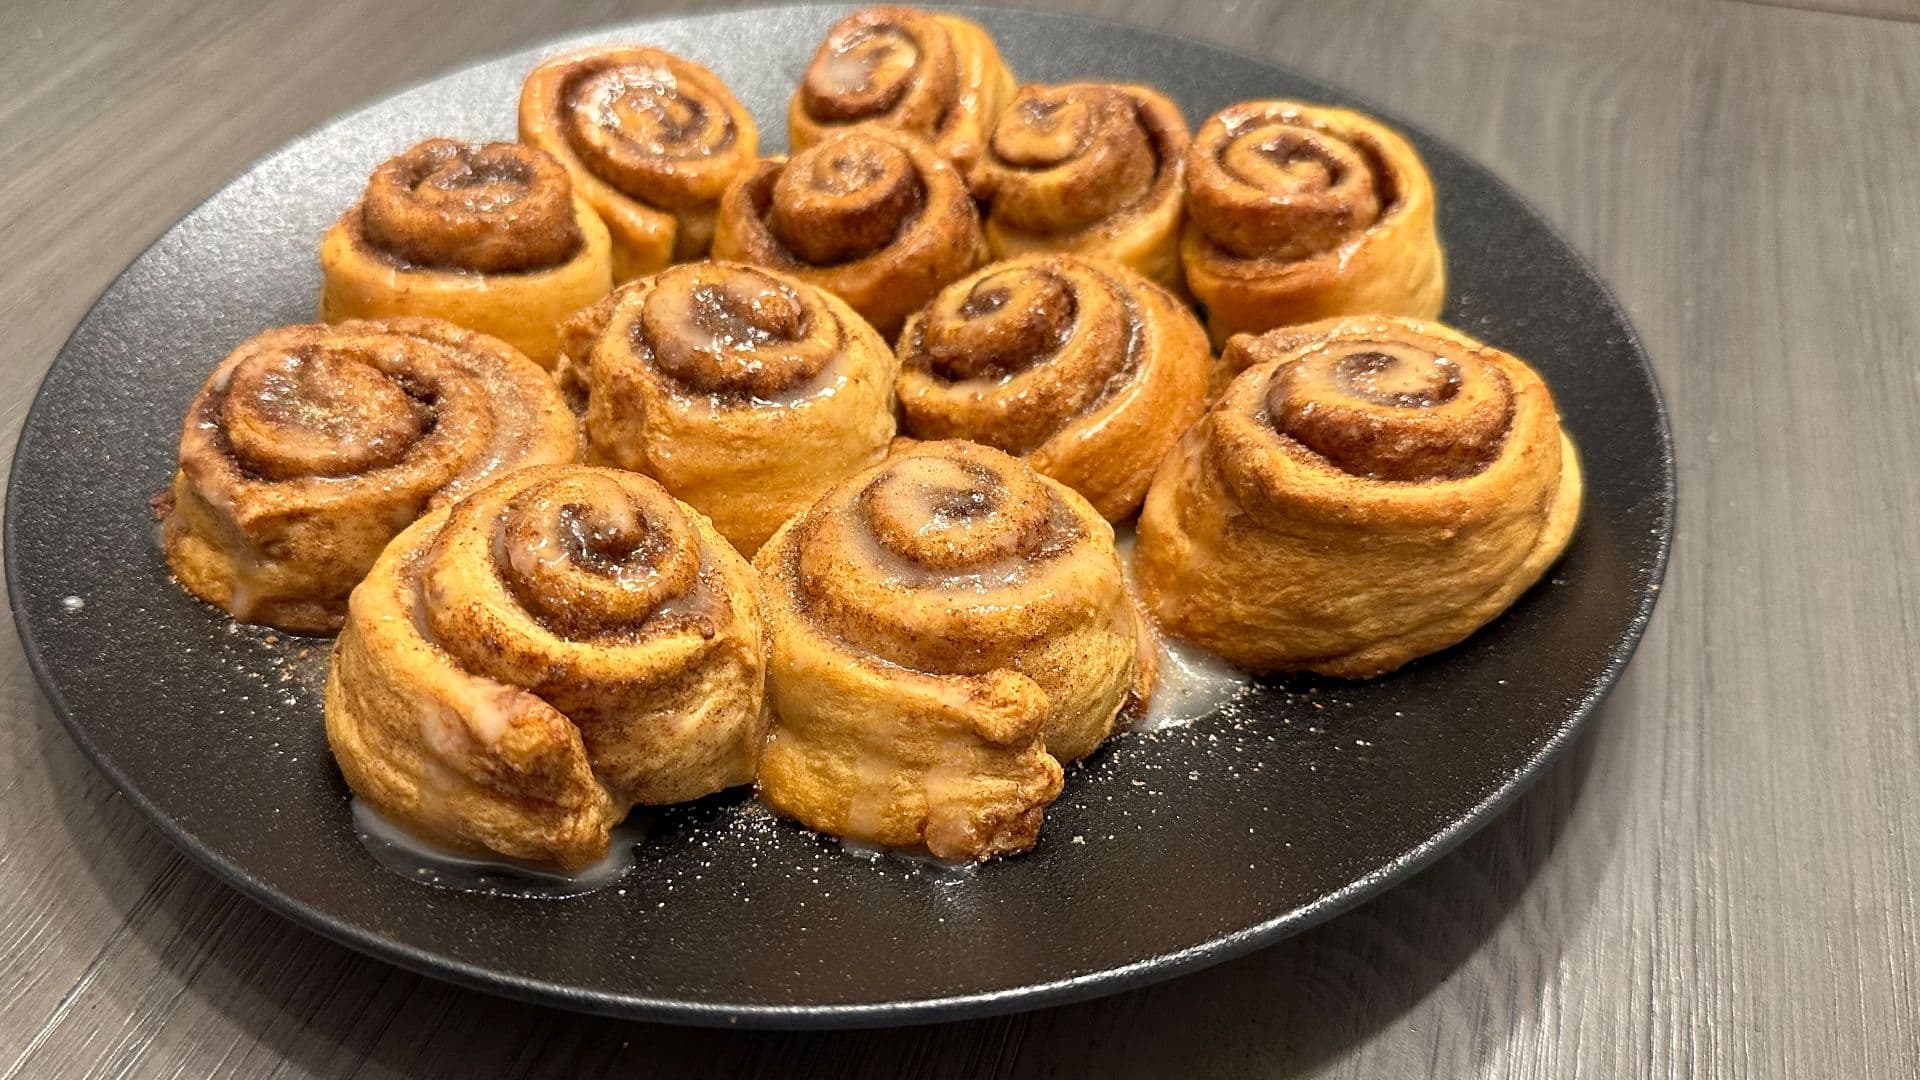
Fluffy, gooey crescent roll cinnamon rolls made right in your air fryer in minutes. An easy shortcut dessert the whole family will love with minimal cleanup required.


Comments
No comments yet — be the first to share your thoughts!
Leave a review
Be the first to share how it went — your note helps other cooks (and earns the recipe its stars).