This post may contain affiliate links. Read our disclosure policy
Watch the recipe
Have you ever tried sushi cones? If not, you definitely need to learn how to make these at home! This recipe will change your life!
When I worked as a sushi cook, the cones were always in serious demand. See, the cones were on the happy hour menu, so you know if it's summer and patio season, cones are flying out of the kitchen. That duty to delivery perfectly wrapped fresh cones was mostly on me and to be fair, very stressful, especially since we had to prepare each order in just under 1 1/2 minutes and there really wasn’t much room to make any mistakes!
Now, don’t let that discourage you if you want to learn how to make these sushi cones at home! Ever since I left that job and I now make sushi for fun, they actually are great when you’re not on a timer so you can really take your time creating your ultimate handheld portion of sushi. That’s a total bonus in terms of enjoyment!

We’ve still got some hot days in summer left, and if you’re hosting parties, I can imagine that you’re just not eager to be making some baked appetizers in your oven, which can heat up your house. I totally love to make Sausage Rolls and phyllo samosas, such as Spinach & Cream Cheese Samosas, but I see those more as winter appetizers! Of course, one of my mottos is that there is no time of year to enjoy good foods, but sometimes the weather just influences your mood!
This is where seeing how to make sushi cones can be transformative. You may believe that there is a huge barrier to entry, but I’m here to show you that there is not! I mention in my free guide to explore your potential in the kitchen, Make Cooking Fun!, that going out to eat can inspire you to try out those favourite dishes at home. Well, you’ll save lots of money and truly serve up some appetizers to remember by seeing how to make a fun temaki cone at home! To put your heart on a plate for all the sushi lovers in your life and to explore Japanese cuisine, I definitely recommend you try out any one (if not all!) of these temaki recipes as part of your Live to Cook one-month challenge! Get started on your cooking journey for free by signing up to my email newsletter, plus you’ll get all of my latest recipes sent straight to your inbox!

In order to see how to make these cones from your very own kitchen from start to finish, then you definitely have to watch the video! If you’re not already, don’t forget to please subscribe to my YouTube channel, and be sure to press the bell button so you’re notified when all of my latest recipe videos are live! Let’s get rolling!
What is a Sushi Cone?▼
Temaki sushi, also known as hand roll sushi or cone sushi, were one of the biggest hits when I worked at restaurants. In Japanese, temaki actually directly translates to “hand roll,” with te translating to “hand” and maki to “to roll.” People ask what is the difference between temaki and maki, and the only difference is that we’re rolling these sushis by hand rather than by using the bamboo mat! Cones specifically, as the name suggests, are hand rolled into cones! Because of their unique shape and visual appeal, they’re indeed a hot item on any restaurant serving sushi. It wasn’t such good news to me in the back making these at the speed of light, and just SO MANY OF THEM! Don’t get me started on how many orders we’d get during happy hour when sushi cones were sold at a discount!

What Rice Do I Use For Sushi Cones?▼
You use sushi rice to make sushi cones. “Sushi rice” is actually a vague term, but essentially you want to look for short-grain white rice that will be starchy. The starchiness of this rice helps the fillings stick onto the nori and help you roll the cones with ease, and prevents everything from falling out! I strongly urge you to steer clear of rice that is not “sushi rice.” For context, the rice that I used is calrose rice, and we even used the brand I used when I was working as a sushi cook.
How Do I Cook Rice for Temaki?▼
You’ll need to cook the rice as per package directions and then season it with rice seasoning. I have all the details in my guide to Making Sushi Rice Over the Stove recipe on the types of rice that are suitable to make sushi rice and how to prepare the most flavourful rice seasoning, so be sure to read that before coming here!
WHat’s the Right Amount of Rice Per Cone?▼
You need a portion thats just a bit larger than a golf ball, about 40-42 grams of sushi rice. The more you’ll make cones, the lesser the need to be super precise since you could just feel what amount was correct.

How to Cut Cucumbers for Cones
- The mini cucumbers need to be washed well, with each end sliced off.
- Cut the cucumber down the middle horizontally into 2 halves and make slanted slits to cut out the pulp. We do this to remove the mushy part and to only retain the crunch parts of the cucumber.
- Then, cut each of the halves into 4 wedges, resulting in a total of 8 wedges from 1 mini cucumber.
- Slice diagonally from the top right of a 1/8th wedge to the bottom left of the wedge to result in 2 pointy, cucumber portions. 1 mini cucumber should yield 16 such portions which are now shaped and ready to be used for cones.
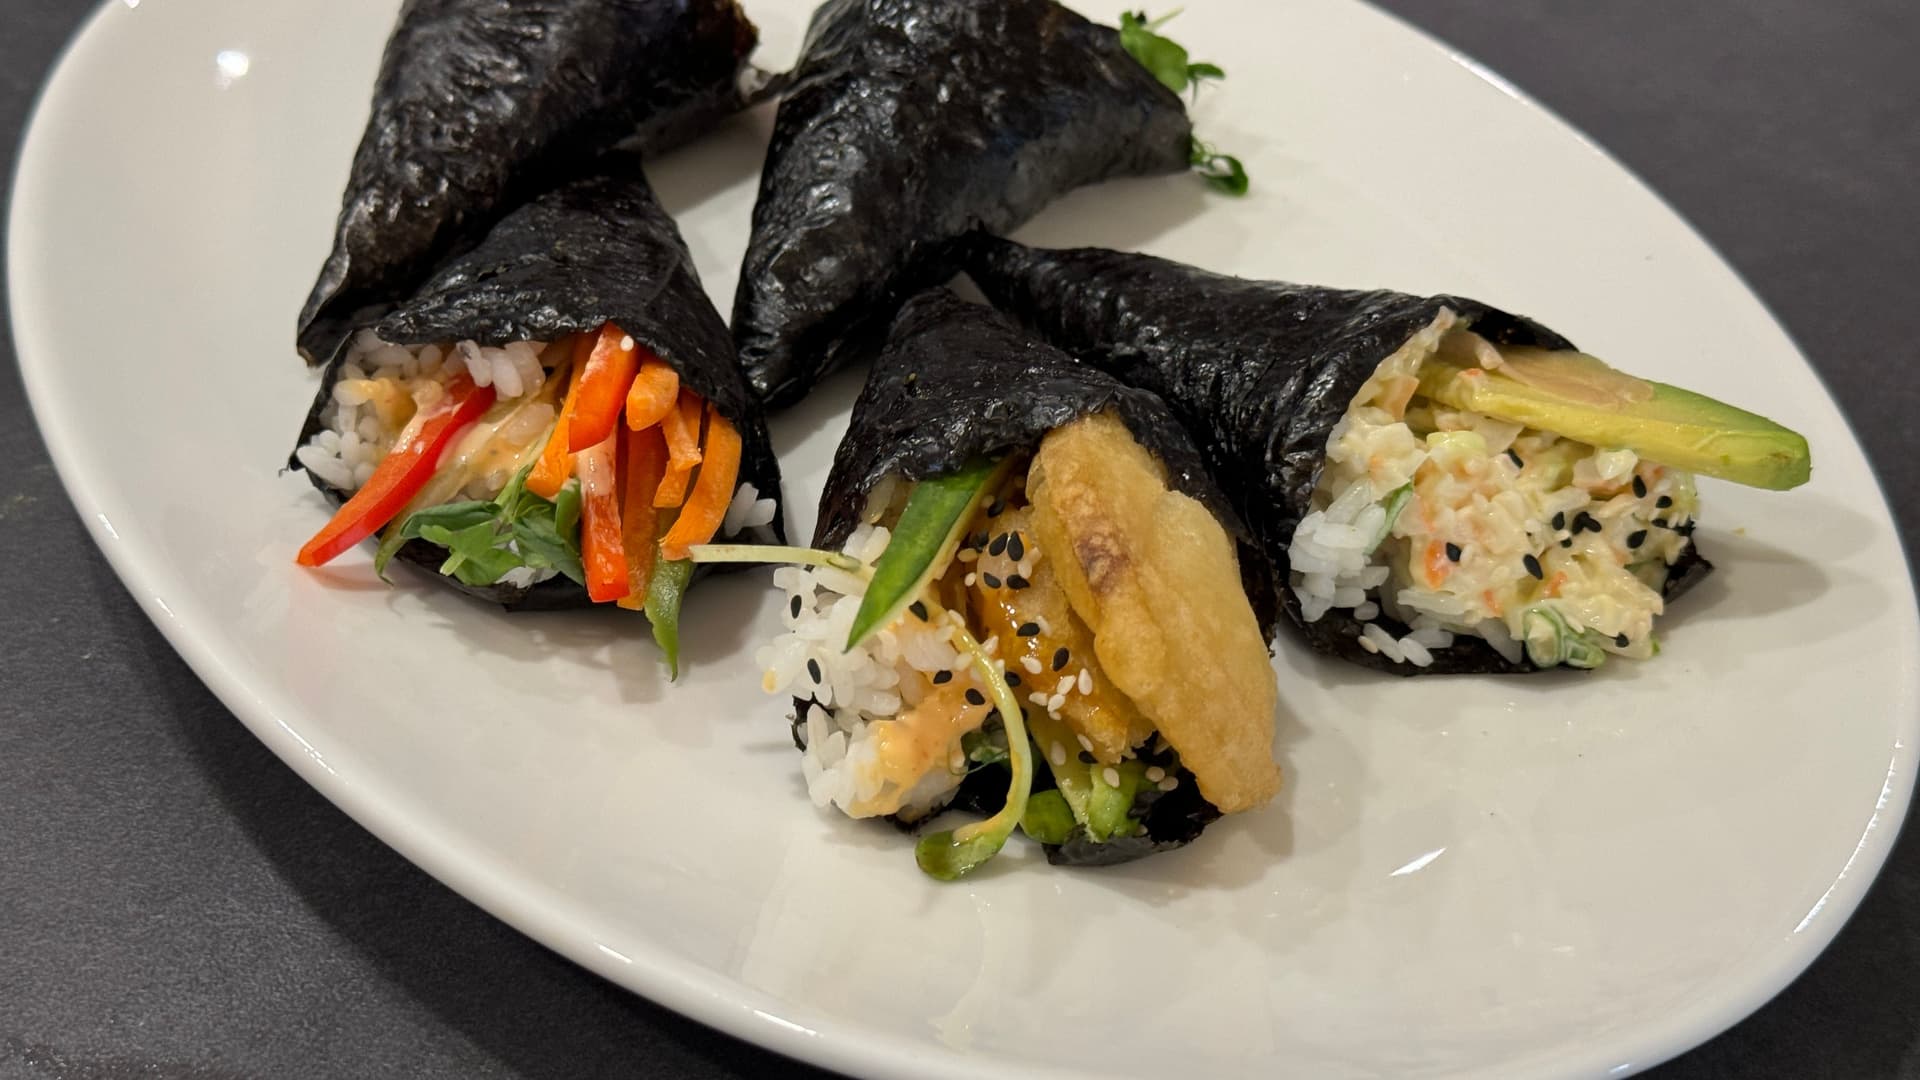
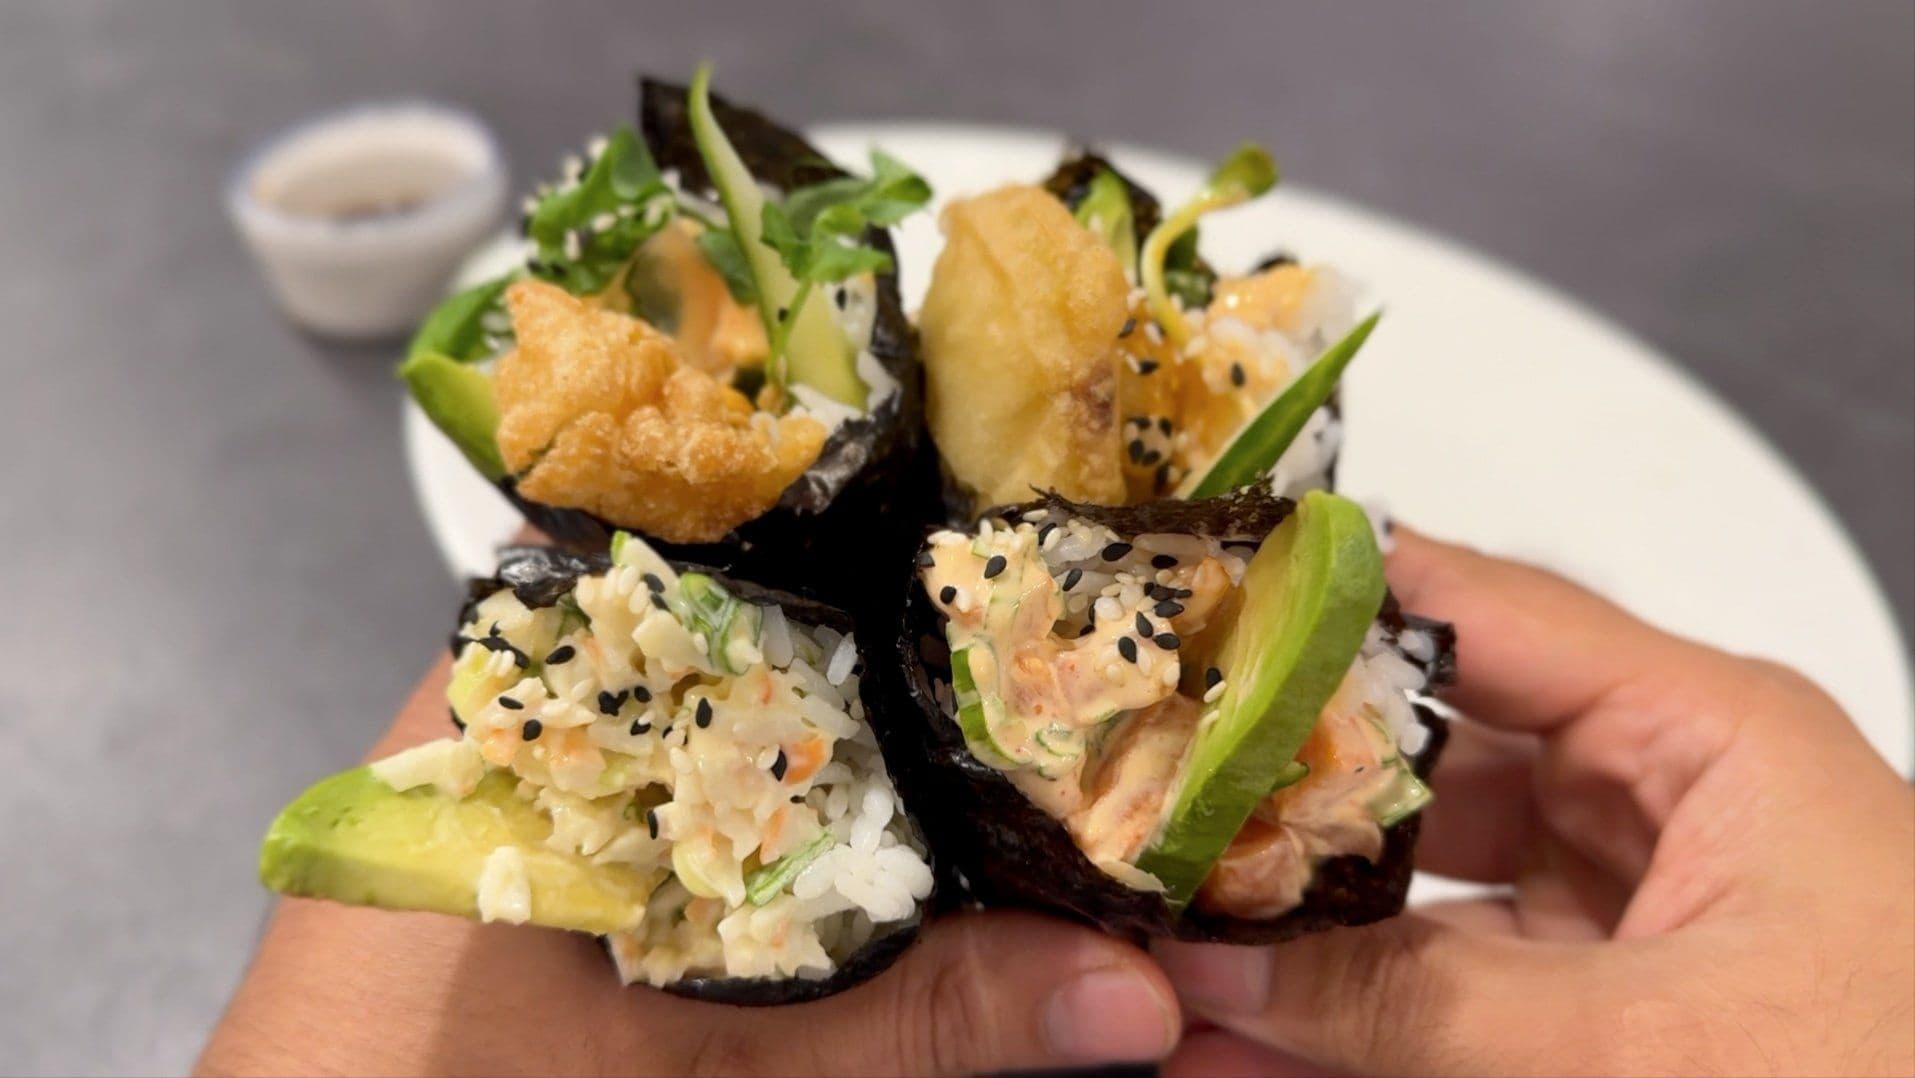
Why You’ll Love These Sushi Cones!
- Fun to make: While it was stressful at work making these, especially when it was happy hour and these were just being demanded nonstop by customers, when there’s no rush at home it’s really fun to make these! I just love rolling everything up together and making the cones filled with goodness!
- Great for entertaining: Ditch those frozen appetizers now! If you want a spread to remember at your next gathering, then you’re sure to impress your guests with temaki! I don’t know someone who doesn’t love sushi, so there are options for everyone
- Simple assembly: No need for special equipment, such as the bamboo mat you need when you’re making regular sushi rolls! Furthermore, you’ll see that all the cones follow a similar process, so it’s just a matter of practice and you’ll be well on your way!
- Plenty of combinations: While I’m showing 5 ideas here, there are honestly so many types of cones you could create! I’ll give a few more ideas later on in this post if you’re looking for even more inspiration, so be sure to keep reading!

How Do You Eat Temaki Hand Rolls?▼
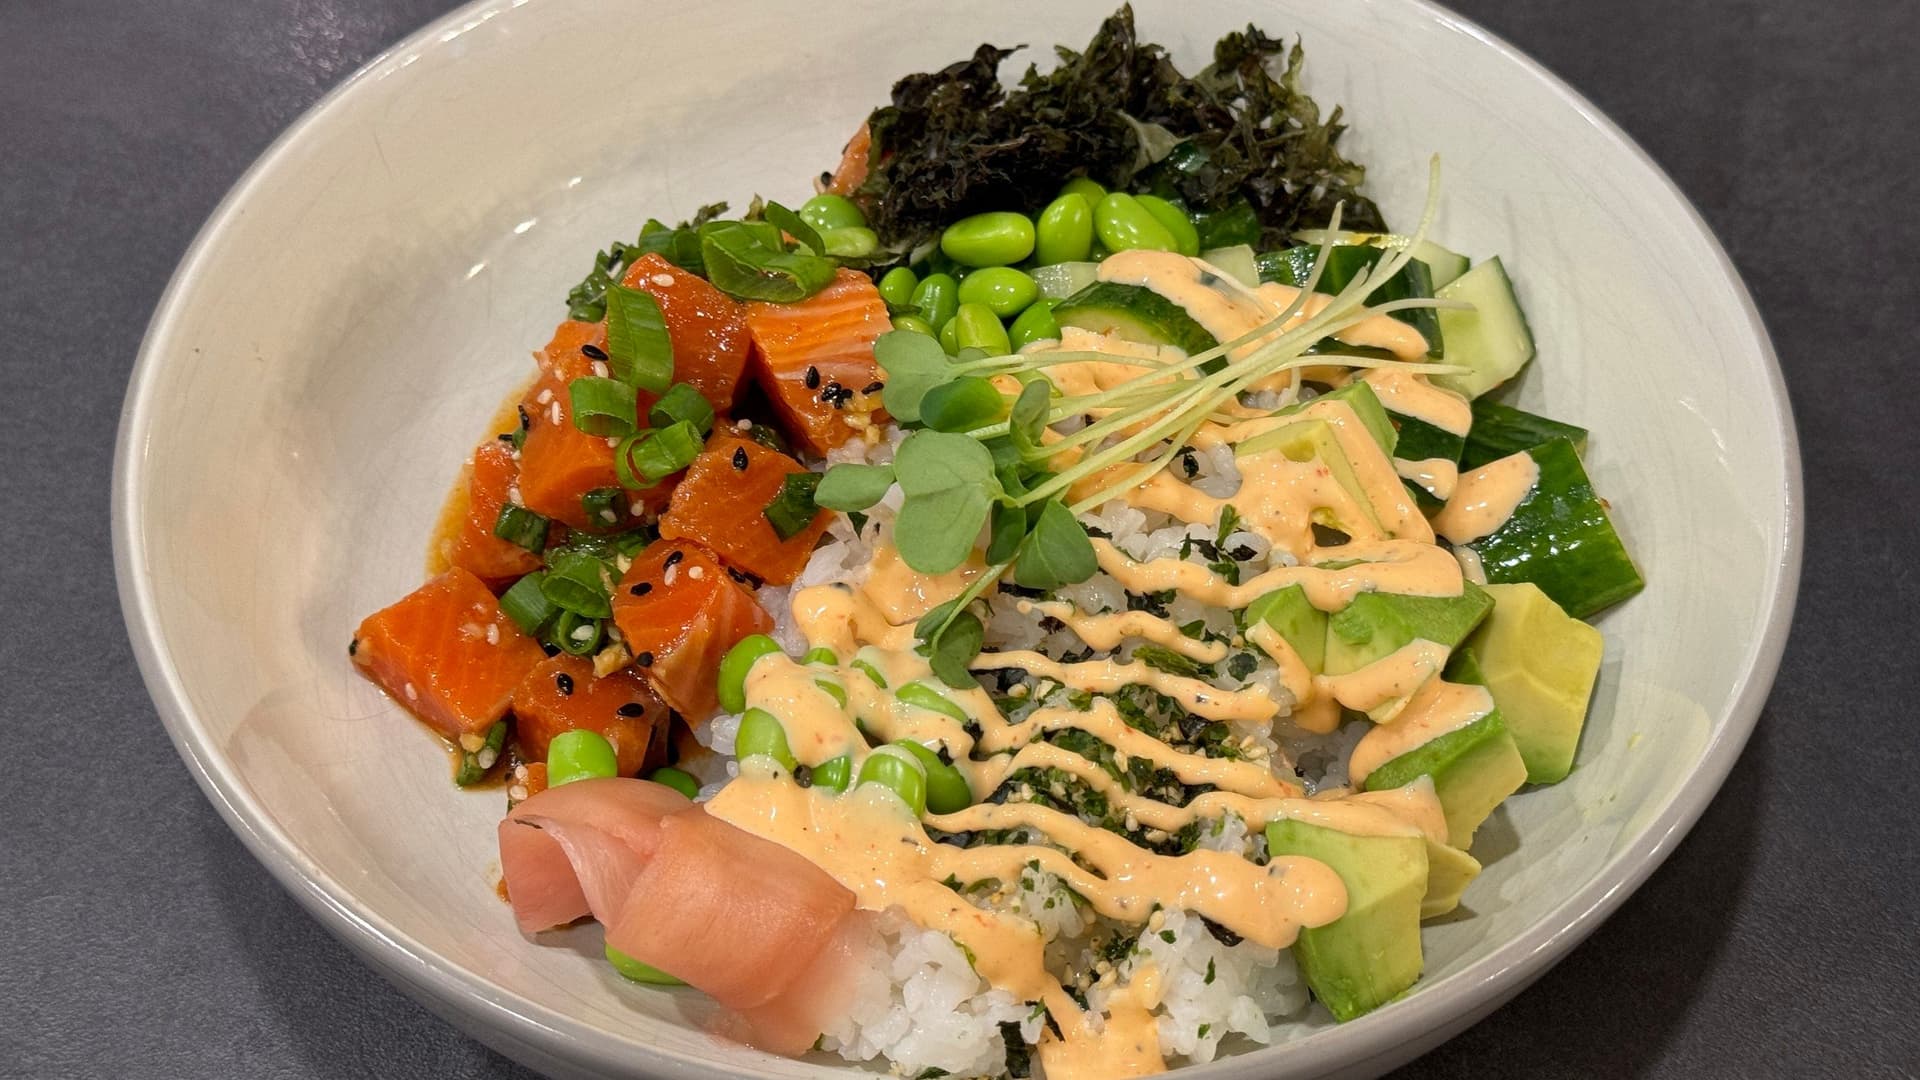
Well, you just hold it and eat it! Just kidding! Sushi hand rolls are served either as a type of sushi or as their own starter in restaurants. You can have them with other types of sushi rolls, gyoza or dumplings, tempura, or soup. Hand rolls are quite versatile, so you can really mix and match them with anything to make a satisfying and delicious restaurant-quality meal at home!
You can also serve with a variety of condiments and dipping sauces. Here are some options:
- Soy sauce
- Sriracha sauce
- Chilli garlic sauce
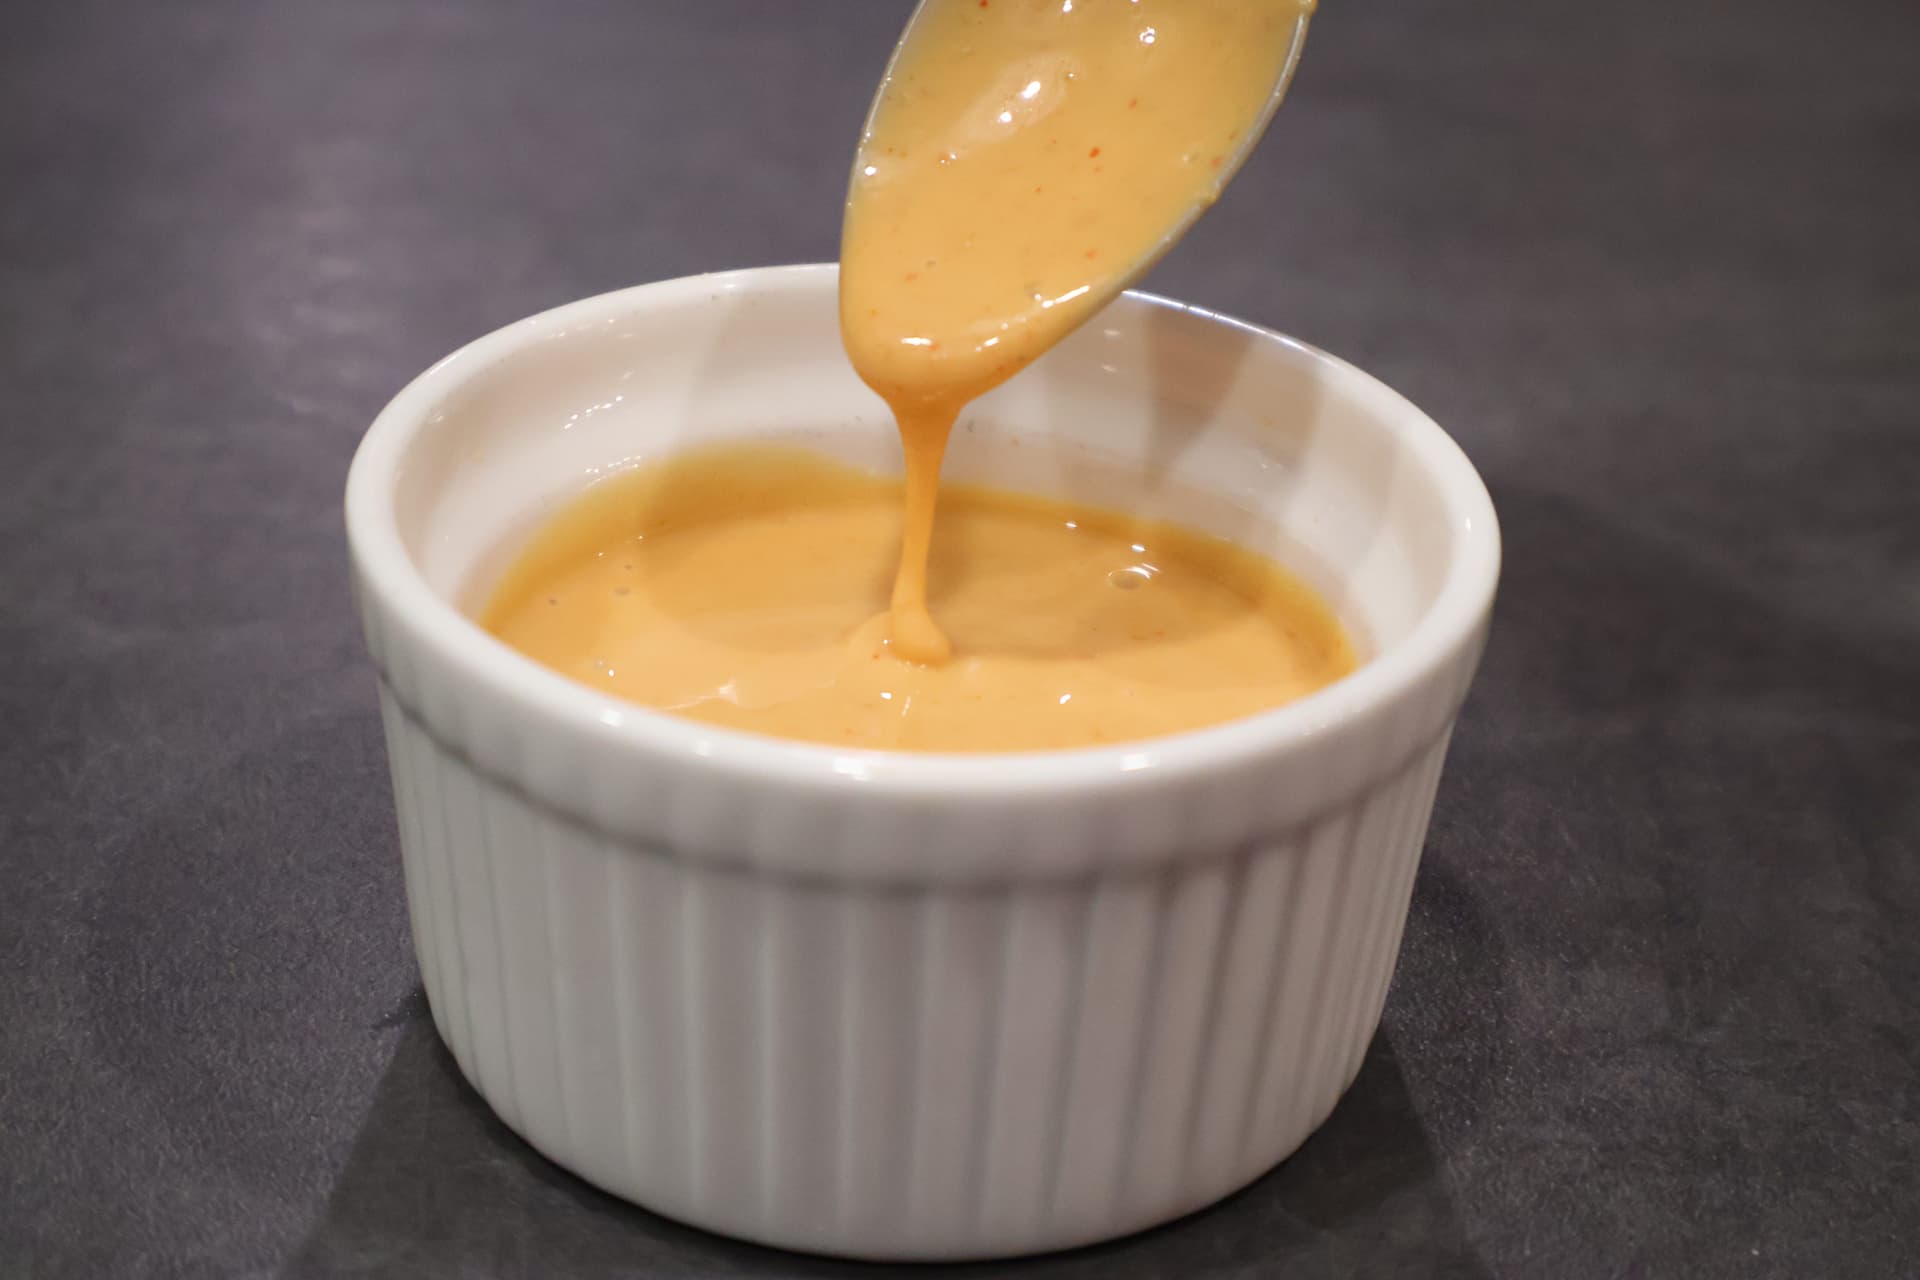
- Spicy Mayo
- Thai Curry Mayo
- Sweet chili sauce
- Pickled ginger
- Wasabi: I used Wasabi paste mixed with water, as you can see below! Now to be honest with you, this isn’t the type of Wasabi I would choose because of the taste and colour, but this was the best I could find in my area. I will look again for better choices!


Equipment to Make Sushi Hand Rolls
The exact tools you’ll need will depend on which hand rolls you want to make. If you want to make them all, well, you’ll need everything!
- Salt crock
- Kitchen scale
- Mixing bowl
- Whisk
- Measuring spoons
- Cutting board
- Chef’s knife
- Saucepan
- Rice paddle
- Thermometer
- Slotted spoon
- Wire rack
- Ramekins: For your dipping sauce!
Tips to Make the Best Temaki at Home
- Make sure to keep the seafood and fish refrigerated until you are ready to prepare the temaki.
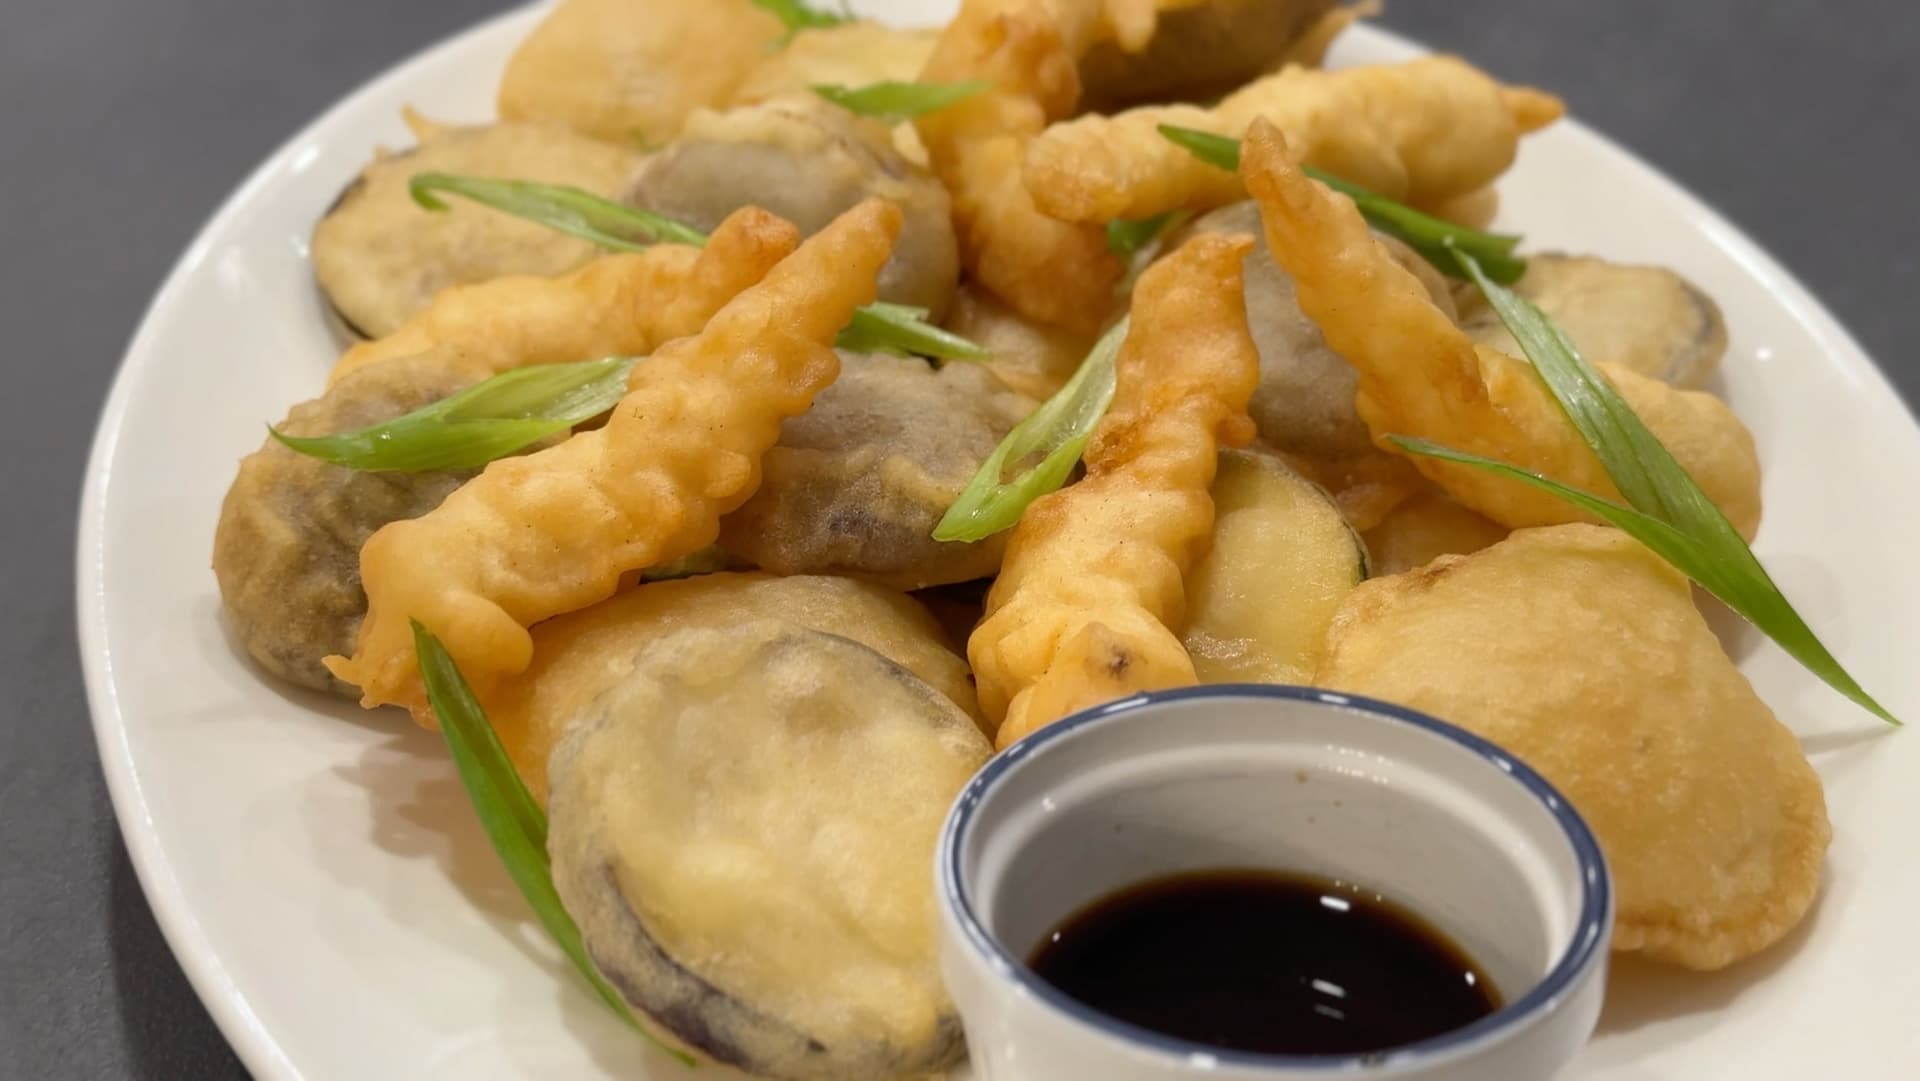
- Having pre-fried tempura already on hand will save you a lot of stress and work as you focus on getting the temakis just right. Make sure to fry the tempura for 1 minute or so before assembling in the cone for a fresh crisp.
- Getting the right amount of sushi rice on the nori sheet is key to ensure the ingredients all compliment each other. Make sure to not use too much or too little rice.
- You need to serve and assemble your sushi hand rolls fresh for the best experience.
- Be careful and patient while rolling the assembled nori into a temaki - unlike when I was working as a sushi cook, you have no timer and you can really be meticulous to get the perfect shape.
Ingredients for Temaki
To see the ingredient quantities for all the five sushi hand rolls recipes I’ll be sharing today and to save them for later, be sure to scroll down to the bottom of this post for the FULL PRINTABLE RECIPE CARD or press the “Jump to Recipe” button. You’ll be able to scale the recipes based on how many sushi rolls you want to make - no estimating required so that you have perfectly stuffed and delicious cones - whichever ones you make!

Basic Ingredients
- Cooked sushi rice: You can see how I make my sushi rice, seasoned with rice vinegar, sugar, and salt.
- Nori sheets: You will cut these in half. I’ll show you exactly how this is done, so don’t worry!
- Avocado: I’ve used this in all of the rolls. You want to cut your avocados into wedges.
- Wasabi: I put a little bit of wasabi in the corner to ensure that each of the nori folds stick together.
- White sesame seeds and black sesame seeds: For garnish.
For the Spicy Salmon Roll

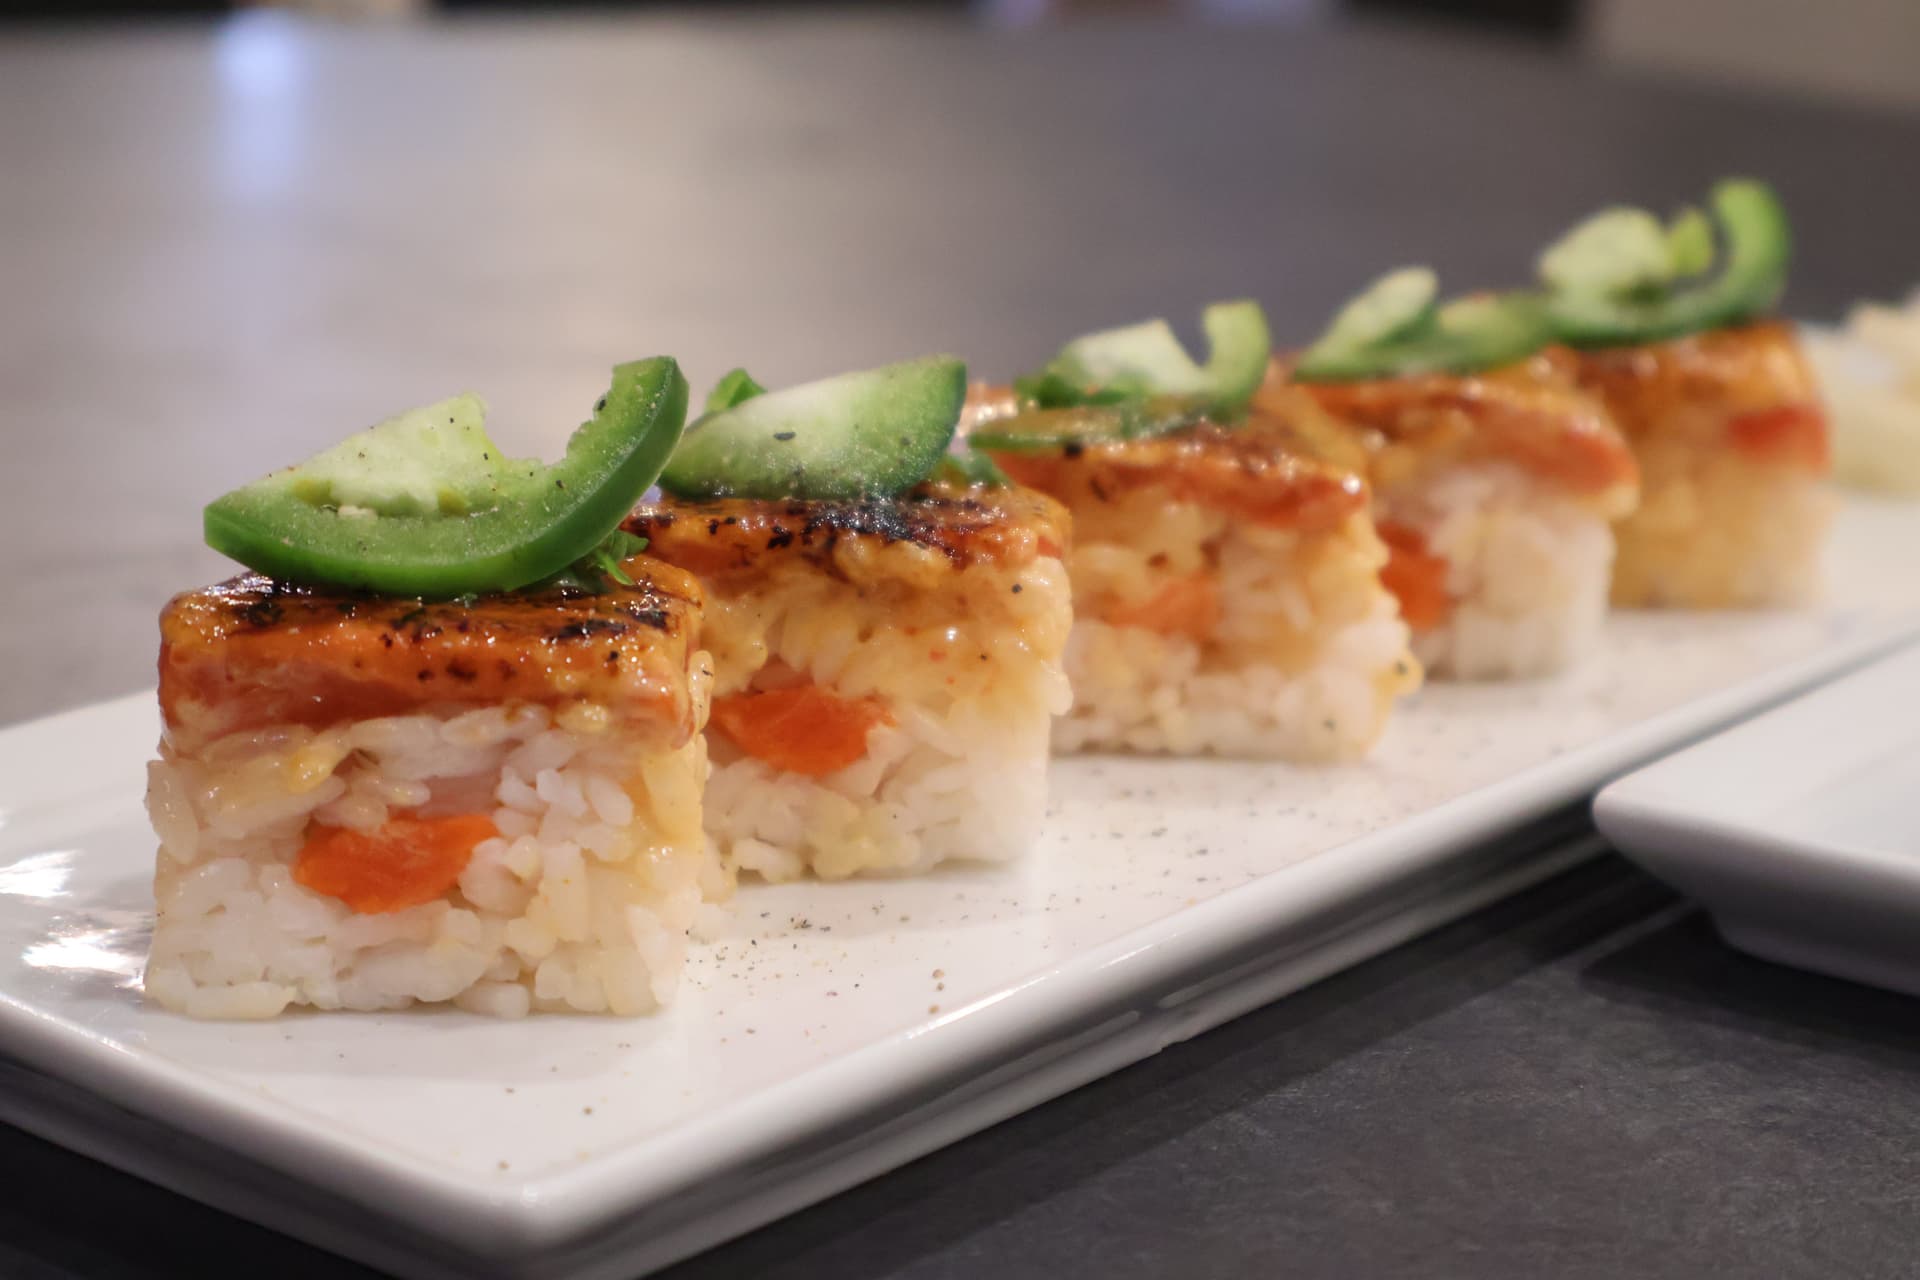
- Salmon: I used wild sockeye salmon that was already frozen. You need to use salmon that was purchased frozen that has a bright orange colour, where wild sockeye salmon comes into play. Otherwise, if you can find sushi-grade salmon, then lucky you! You can use that.
- Spicy aioli: Check out my recipe and substitute the regular mayonnaise for Japanese mayonnaise.
- Green onion: Finely sliced.

For the Shrimp Tempura Temaki
- Shrimp tempura: Click to get my guide on making restaurant-style tempura right at home, including shrimp tempura! You’ll have to prepare your tempura batter, prepare the shrimp for the batter, and fry.
- Cucumber: Thinly sliced into wedges, then diagonally halved.
- Spicy aioli
- Pickled ginger/gari: I definitely recommend you make it yourself, but if you don’t want to, then you can buy it pre-made. However, the homemade pickled ginger just tastes really fresh and much less salty!
- Micro-green pieces: You can also do micro broccoli, micro radishes, or even some bean sprouts, if desired.
- Tobiko: This is called “flying fish roe,” but essentially these are fish eggs. I couldn’t find them anywhere near me - including at Asian grocers - so I skipped out on this ingredient. However, if you are able to find it and want to use it, then I recommend these as an optional garnish.

For the California Temaki
- Imitation crab (Surimi): I got the “crab-style legs” at my grocery store. This imitation crab is actually made from white fish, called pollock, in this case, and is made to look like crab. Don’t worry, the imitation crab is actually used at sushi restaurants, too, unless you can easily get crab where you are. Look for the crab legs and not the flakes. You’ll shred this up.
- Japanese mayonnaise: To mix with the crab.
- Cucumber: Thinly sliced.
For the Yam Tempura Temaki

- Yam tempura: I’ve shown how to make vegetarian tempura in my tempura guide as well!
- Cucumber: Thinly sliced into wedges.
- Spicy aioli
For the Vegetarian Temaki

- Cucumber: Thinly sliced into wedges
- Carrots: Julienned. Baby carrots work fine here.
- Bell pepper: Thinly sliced.
- Microgreen pieces
How to Make Sushi Hand Rolls at Home
Heat oil in a wok or sauce pan to prepare the tempura temakis. You can either make the tempura from scratch or use pre-fried tempura and refry them for 45 seconds before making the sushi hand rolls.
Prepare the Spicy Salmon Mix, cube the salmon into 1/2 inch cubes and place in a bowl. Add the spicy aioli, green onions and mix well.


Refrigerate until ready to use.

For the Crab Mix, shred the imitation crab sticks and chop them finely and place in a bowl. Add the Japanese mayonnaise, green onions and mix well. Refrigerate until ready to use.


Place the half nori sheet lengthwise onto a dry, clean cutting board.


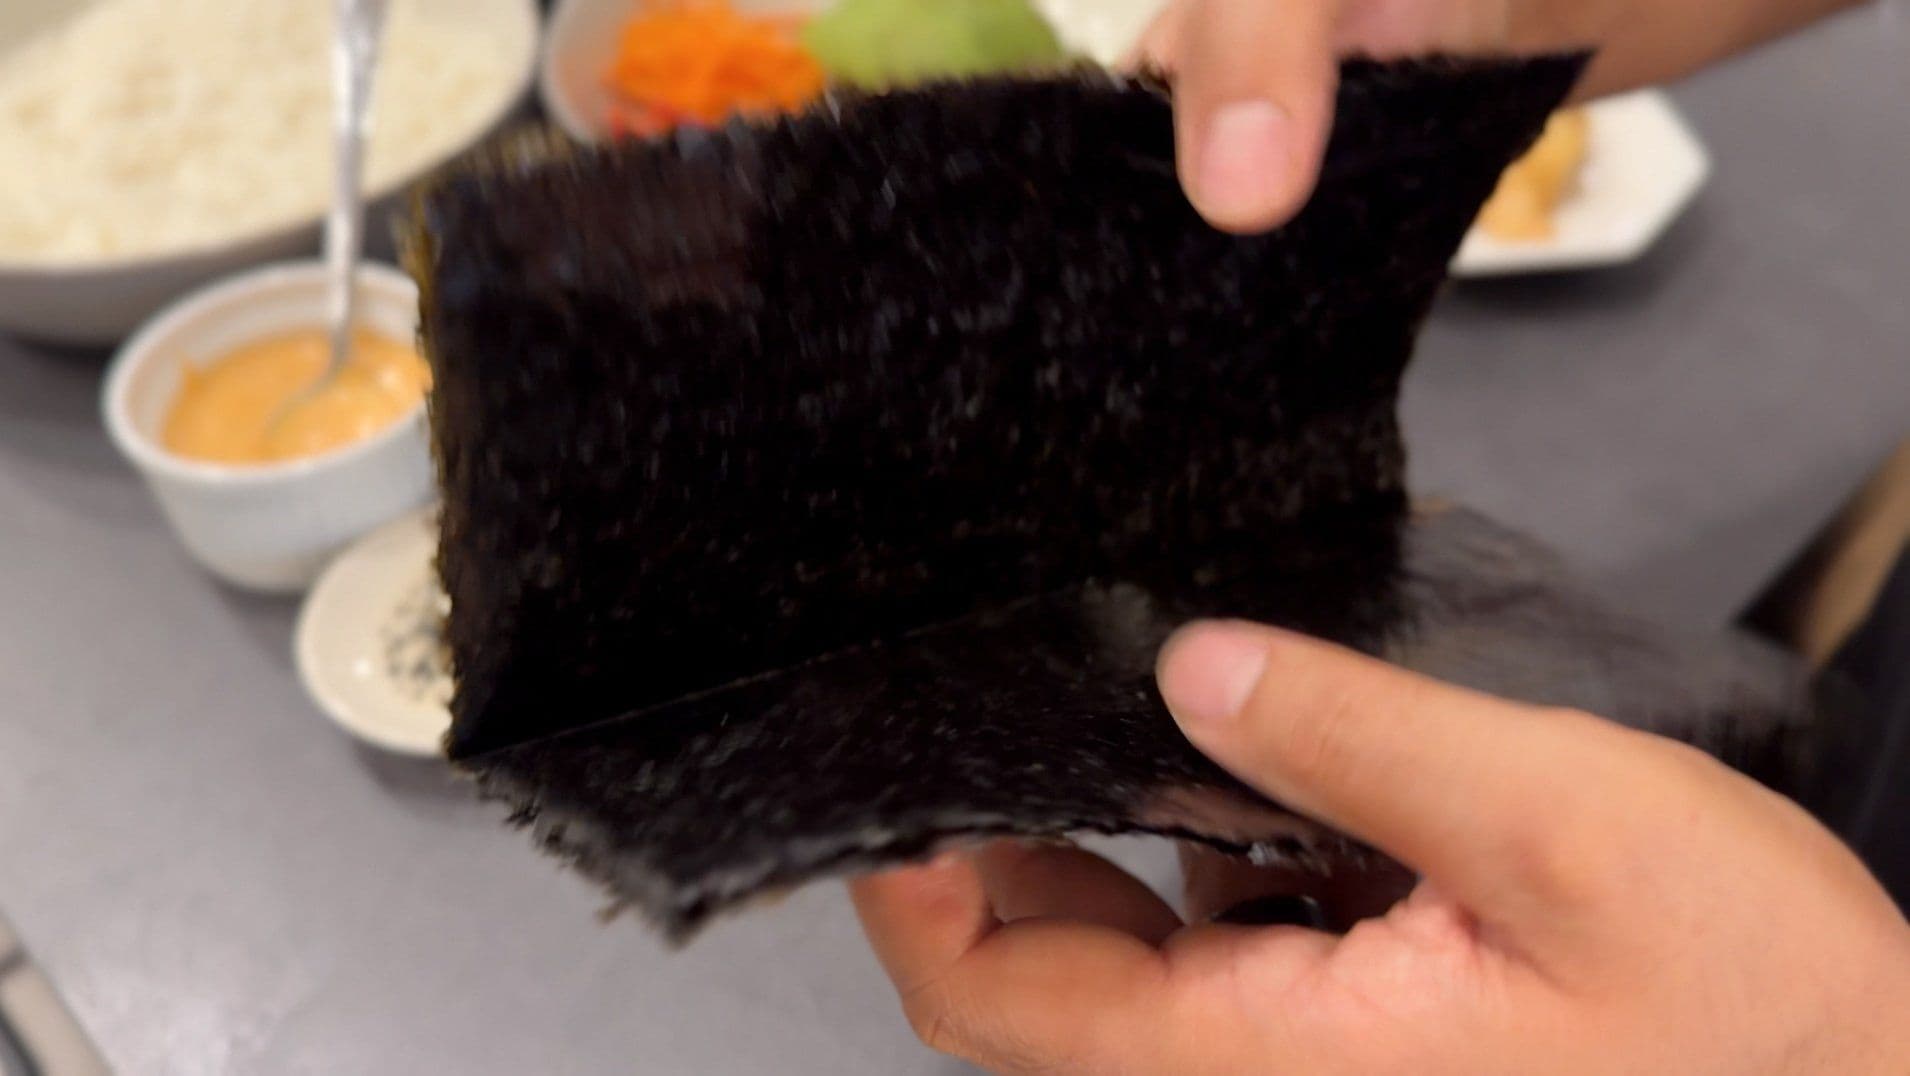


Pile the sushi rice onto the left half of the paper leaving the bottom left corner without any rice. Spread a small amount of wasabi on the bottom right corner and fold it over the cone. The wasabi helps the nori stick together.


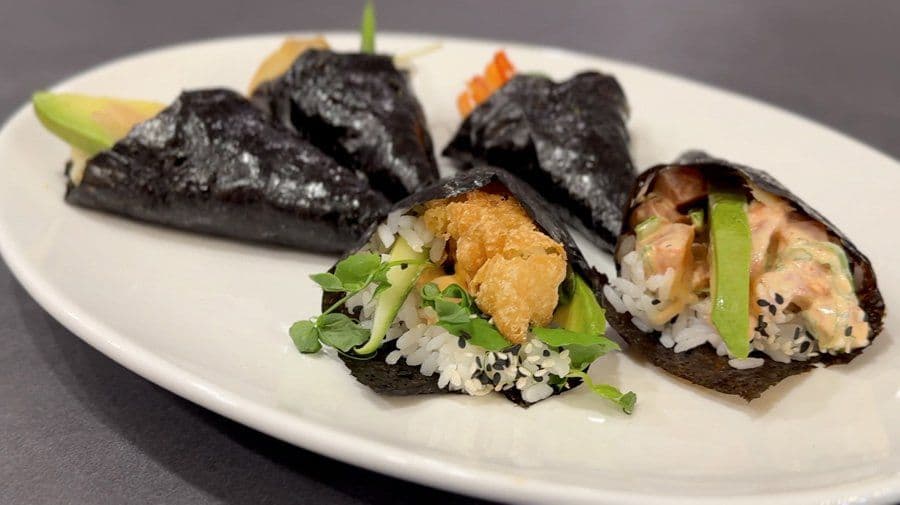
Spicy Salmon Temaki
Add 1-2 Tbsp of the spicy salmon mix over the rice, top with pickled ginger and avocado.


Maintaining the triangle shape, tuck the side of the nori in with your fingers as you carefully roll the nori. During this step, the bottom of the cone must form a point before you continue rolling. Finish rolling, lightly press once wrapped to allow the wasabi to stick the cone's edge together.


Sprinkle the sesame seeds over the top of the cone.

California Temaki
Add 1-2 Tbsp of the crab mix over the rice, top with pickled ginger, cucumber and avocado.


Maintaining the triangle shape, tuck the side of the nori in with your fingers as you carefully roll the nori. During this step, the bottom of the cone must form a point before you continue rolling. Finish rolling, lightly press once wrapped to allow the wasabi to stick the cone's edge together.


Sprinkle the sesame seeds over the top of the cone.

Shrimp Tempura Temaki
Fry the shrimp tempura in the deep fryer for 1 minute.


Spread the spicy aioli on the rice diagonally from the top left corner to 3/4 of the way to the bottom. Place the pickled ginger over the spicy aioli, add micro greens on top, followed by the cucumber and avocado on either side. Place the tempura shrimp over the micro greens.


Maintaining the triangle shape, tuck the side of the nori in with your fingers as you carefully roll the nori. During this step, the bottom of the cone must form a point before you continue rolling. Finish rolling, lightly press once wrapped to allow the wasabi to stick the cone's edge together.


Sprinkle the sesame seeds over the top of the cone.

Vegetarian Temaki
Spread the spicy aioli on the rice diagonally from the top left corner to 3/4 of the way to the bottom.

Place the pickled ginger over the spicy aioli, add micro greens on top, followed by the cucumber and avocado on either side.


Place the julienned peppers and carrots over the micro greens.


Maintaining the triangle shape, tuck the side of the nori in with your fingers as you carefully roll the nori. During this step, the bottom of the cone must form a point before you continue rolling. Finish rolling, lightly press once wrapped to allow the wasabi to stick the cone's edge together.


Yam Tempura Temaki
Fry the yam tempura in the deep fryer for 1 minute.


Spread the spicy aioli on the rice diagonally from the top left corner to 3⁄4 of the way to the bottom. Place the pickled ginger over the spicy aioli, add micro greens on top, followed by the cucumber and avocado on either side. Place the tempura yam over the micro greens.

Maintaining the triangle shape, tuck the side of the nori in with your fingers as you carefully roll the nori. During this step, the bottom of the cone must form a point before you continue rolling. Finish rolling, lightly press once wrapped to allow the wasabi to stick the cone's edge together.


Sprinkle the sesame seeds over the top of the cone.


Enjoy your sushi cones!

What Are Other Types of Cone Style Sushi?▼
- Rainbow Temaki (with Tuna, Salmon and Avocado)
- Smoked Salmon and Cream cheese Temaki
- Spicy Albacore Tuna Temaki
- Salmon and Avocado Temaki
- Avocado Temaki
- Greens mix, Cucumber and Avocado temaki
- ..and so much more!
Can I Make Cone Sushi in Advance?▼
No, you certainly cannot make these in advance. This is because the nori will become soggy. However, even if you want to just make one of these types of sushi hand rolls, then some preparation can go a long way! Here are some tips and tricks to prep your components in advance so that you’re ready to roll up your cones when the time comes!
- I certainly recommend that you prepare your sushi rice in advance as this takes some time to make!
- Prepare the salmon or crab fillings in advance and store in an airtight container in the fridge.
- If making tempura, ideally you would fry them fresh. However, if you’ve made extra tempura or you really just want to make it in advance, I would keep prepared tempura in the fridge for at most 4 days, depending on how fresh the shrimp and vegetables were. Then, you will refresh your pre-fried tempura when it’s time to make your temaki cones. Alternatively, I would simply make the tempura batter in advance and prepare the shrimp and/or vegetables to be battered and fried fresh.
- Slice your avocados, cucumbers, and other vegetables (if using) in advance.


Comments
No comments yet — be the first to share your thoughts!
Leave a comment