Super crispy air fryer chicken thighs with juicy, tender meat inside. Quick, easy, and gluten-free, this foolproof recipe delivers perfect results every single time.
Need delicious protein for any occasion ready in a flash without too many dishes? This Super Crisp Air Fryer Skin-On Chicken Thighs recipe will deliver on your weeknight dinner needs! I give more information in my free motivational guide to explore your potential in the kitchen, Make Cooking Fun!!, setting realistic goals with your cooking is key to success! If you know me, I love chicken, and it’s one of my favorite proteins. Chicken thighs in particular are my favorite way to enjoy chicken. Chicken thighs are super juicy and flavorful and I find them much more versatile than chicken breast.
With that being said, ever since I started to air frymy chicken thighs, my life has totally changed! By the end of this post, you will learn the best way to prep and air fry chicken thighs so that you’ve got the best results every single time. Especially if you’re going to air fry chicken thighs with the skin on, you’ve got such a fantastic protein ready for you with just a couple of steps! However, if you’ve been struggling with soggy skin, then this recipe will show you how to troubleshoot for crispy skin and maximum flavor! After following this easy air fryer skin-on chicken thighs recipe, I guarantee chicken thighs will no longer be a pesky protein for you, so I strongly encourage you to try this out as part of your Live to Cook one-month challenge! Get started for free today by signing up to my email newsletter, plus all of my latest recipes will be delivered straight to your email inbox.
You don’t want to miss the video to see all the tips and tricks and troubleshooting the mistakes in action! I would also really appreciate it if you could please subscribe to my YouTube channel, and be sure to hit the bell button to be notified when all my latest video recipes go live! Let's get air frying!
Why You’ll Love This Air Fryer Chicken Thighs Recipe!
Fast: You’ll see that this recipe for air fried chicken thighs is quite quick! The prep and seasoning is super speedy, and then we just let the air fryer do the work after that. Once that’s done, then your perfect chicken thighs are ready for you to enjoy!
Simple: We essentially just have 3 steps in this recipe, so it’s excellent for beginner cooks to cook flavorful chicken thighs with the perfect crispy skin!
Perfect to meal prep: Chicken thighs are awesome to meal prep, and the air fryer helps you batch cook lots of thighs so you’ve got enough for multiple meals! If you’re loving a particular flavor, then you could marinade or season multiple chicken thighs and then air fry them. You could also make different marinades/seasonings and air fry those thighs at the same time. If you’re looking for information on how I meal prep my proteins for the week, then check out the video here, and you can also refer to the storage and reheating instructions I’ve outlined later on in this post after you’ve cooked your chicken thighs.
Easy on the wallet: We all know that prices won’t stop rising at grocery stores, and it’s a real bummer! However, chicken thighs tend to be cheaper than chicken breasts. I notice they go on sale much more often, and even in general they are more economical than chicken breasts. Sometimes you can get a club pack of chicken thighs for about $12 CAD or less for over a kilogram of chicken thighs! Furthermore, if you’re buying skin-on chicken thighs, then you’ll save even more money. The pack I got was only $10 CAD - a really excellent deal these days!
Customizable: I find that chicken thighs need a bit more work to be delicious, but once you add some love, they turn out incredible! You can season the chicken thighs with a variety of spice blends and marinades. I’ve got some options further down below in this post, so be sure to check that out for inspiration!
Are These Air Fryer Chicken Thighs Healthy?▼
Chicken thighs can certainly be healthy! Chicken thighs are a great source of protein and are an excellent source of vitamin B12. A 100 gram portion of skinless chicken thighs (about 3.5 ounces) contain 18 grams of protein, 8 grams of fat, and 144 calories, while the same amount of chicken breast contains 106 calories for 22.5 grams of protein with only 2 grams of fat. However, I can speak for most people that chicken thighs are indeed tastier because of the extra fat! If you can budget in chicken thighs into your calories, I totally believe they’re worth it!
Additionally, air frying is a fairly nutritious cooking method. As you’ll see, we’ll only need a couple of sprays of olive oil around the chicken thighs to get the crispiness we’re looking for - the air fryer does all the work without tons of oil needed!
One caveat is that skin-on chicken thighs are quite high in fat due to the skin. We saw earlier that skinless chicken thighs had 8 grams of fat for 144 calories. With the skin, you’ll have about 250 calories, 20 grams of fat, and the same 18 grams of protein. I’ll be showing you how to get crispy and delicious skin in this recipe, so I suggest you enjoy it as a fantastic delight! However, if you really don’t want the excess fat, you can remove the skin from the chicken thighs after you’ve cooked them. You’ll still get the flavour from the crispy skin after cooking!
Tools Needed to Make Air Fryer Skin-On Chicken Thighs
Gloves: They’re great to maneuver the chicken thighs and to apply the seasoning thoroughly without getting your hands dirty!
Salt crock: A handy way to store your salt so it’s convenient and right next for you to season the chicken thighs!
Air fryer: We can’t have air fryer skin-on chicken thighs without the air fryer! The air fryer I’ve been using for nearly a year now is the Cosori 6 Quart Air Fryer. It’s got a fairly large basket that can hold a considerable amount of food, it’s got plenty of useful settings, and it’s quiet! To learn more about the different settings and how to use the air fryer, check out my complete review here.
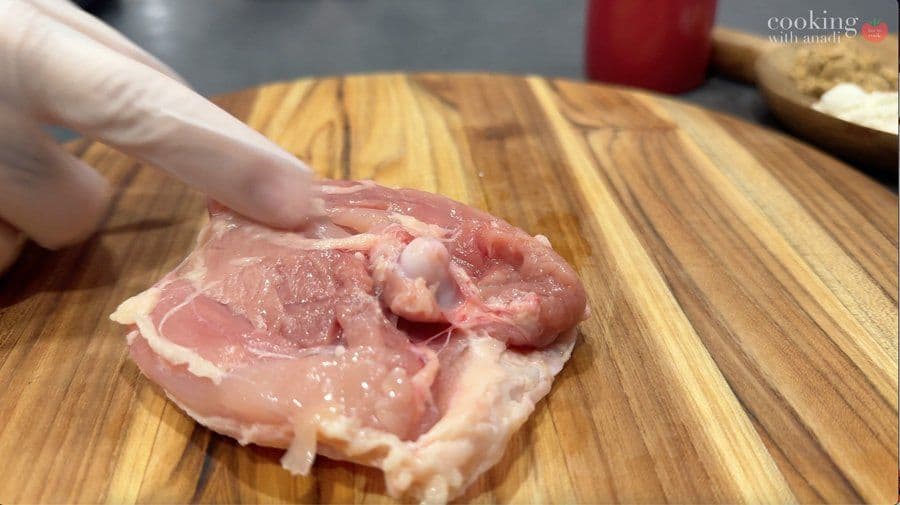
Chef’s knife: To trim the fat off the chicken thighs if your pieces have excess fat.
Cutting board: We want a clean work surface to cut off the fat from the chicken thighs and for seasoning the chicken thighs.
Olive oil dispenser: This has been a real game changer for me! I really dislike those olive oil sprays - it’s not even real oil! I like to go all-natural, and placing the olive oil in a dispenser allows you to spray the oil, ultimately using less covering a greater surface area, while still using actual olive oil!
Tongs: A must-have to carefully place the chicken thighs into the air fryer basket and then to remove them once they’ve finished cooking.
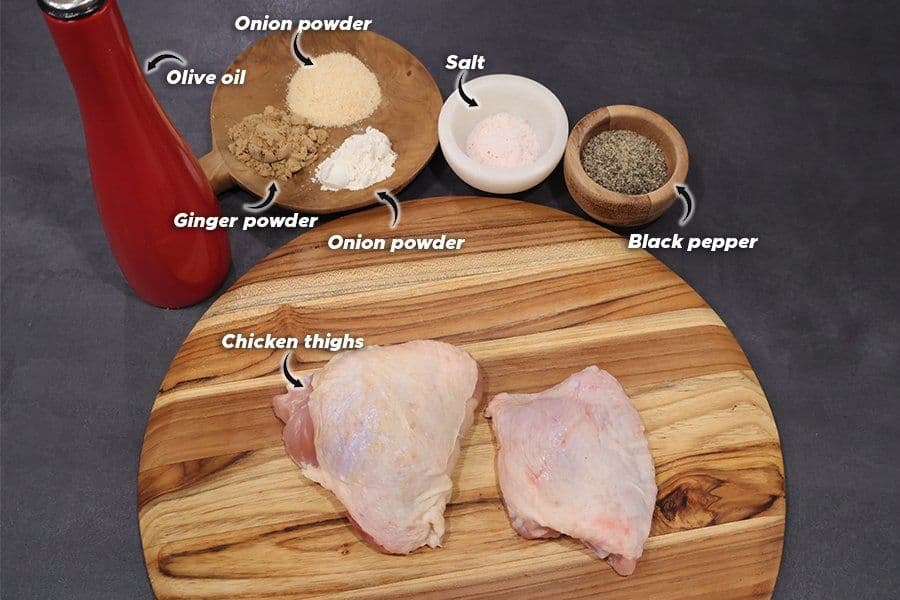
Ingredients for Chicken Thighs in the Air Fryer
You can find all ingredients and save the recipe instructions by scrolling to the bottom of this post FULL PRINTABLE RECIPE CARD, or press the “Jump to Recipe” button to save the recipe for later and to see all ingredients and their quantities. These ingredients will be for 5 medium-sized chicken thighs.
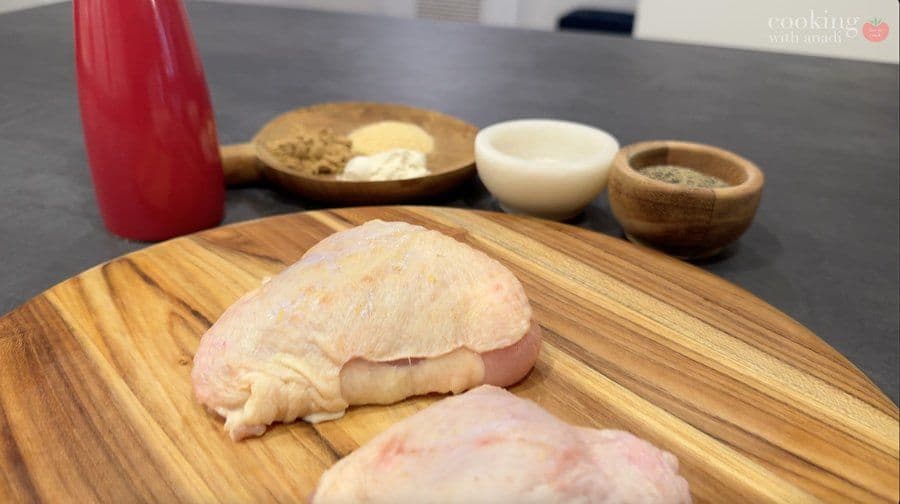
Chicken thighs: Skin-on and boneless chicken thighs here.
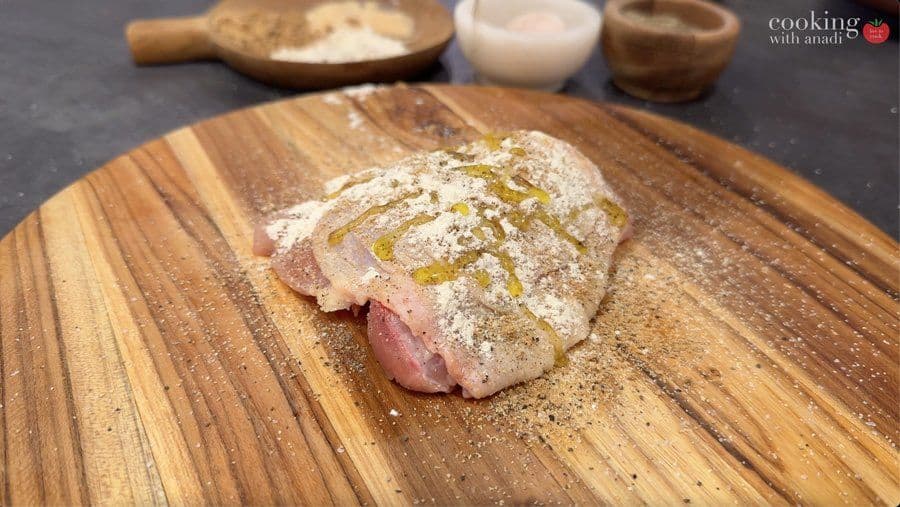
Olive oil: You want to add olive oil on top to prevent the spices from burning on the skin of the chicken thighs.
Black pepper: If it’s accessible to you, then I would highly recommend freshly cracked black peppercorns. Unfortunately, my pepper mill broke some time ago, so I’ve been substituting with ground pepper - it does the job just fine!
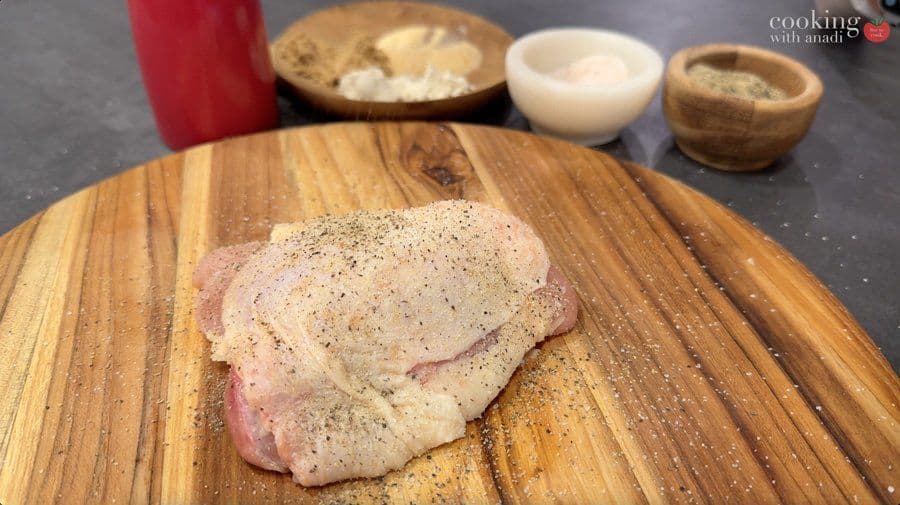
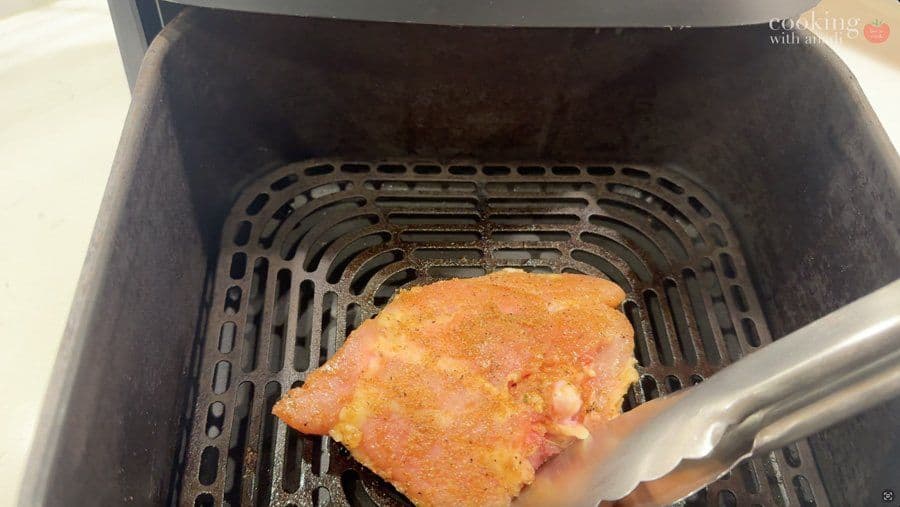
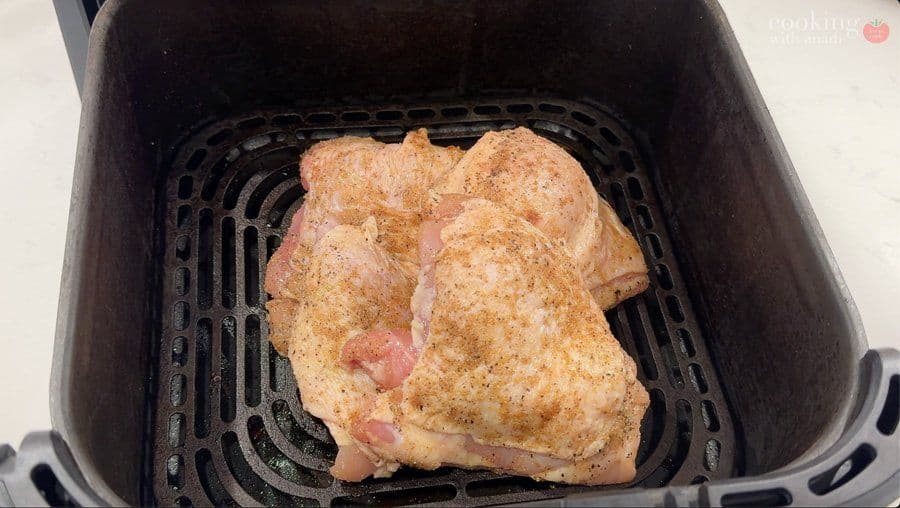
Pat the chicken thighs aggressively dry until the paper towel comes away completely dry.
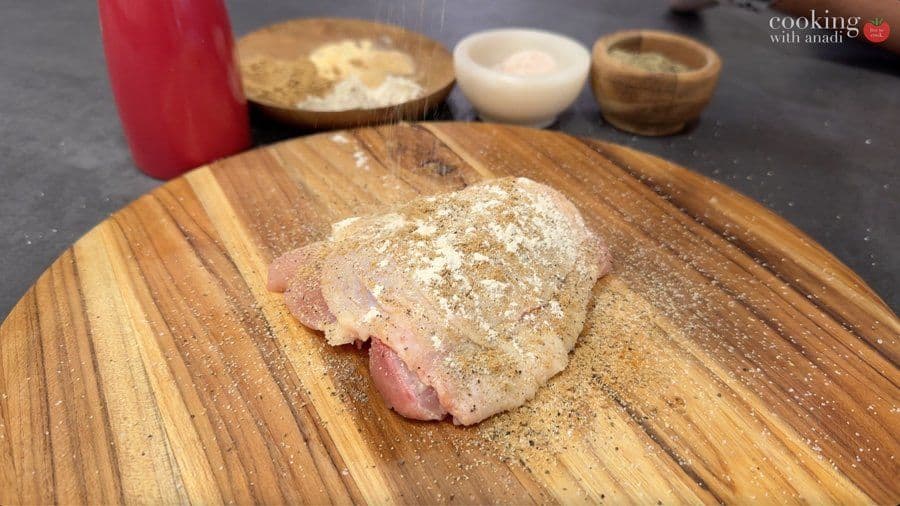
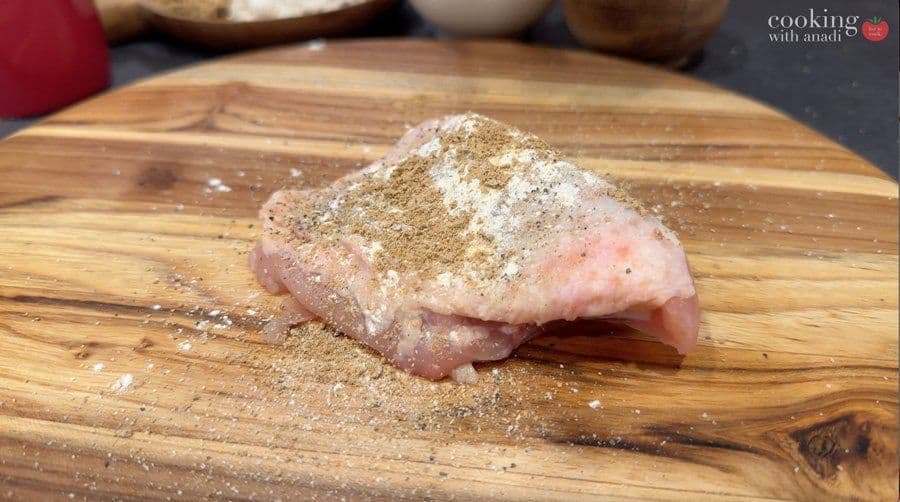
Season evenly with salt, pepper, garlic powder, and onion powder. Drizzle about 1 teaspoon oil over the skin and rub lightly to coat.
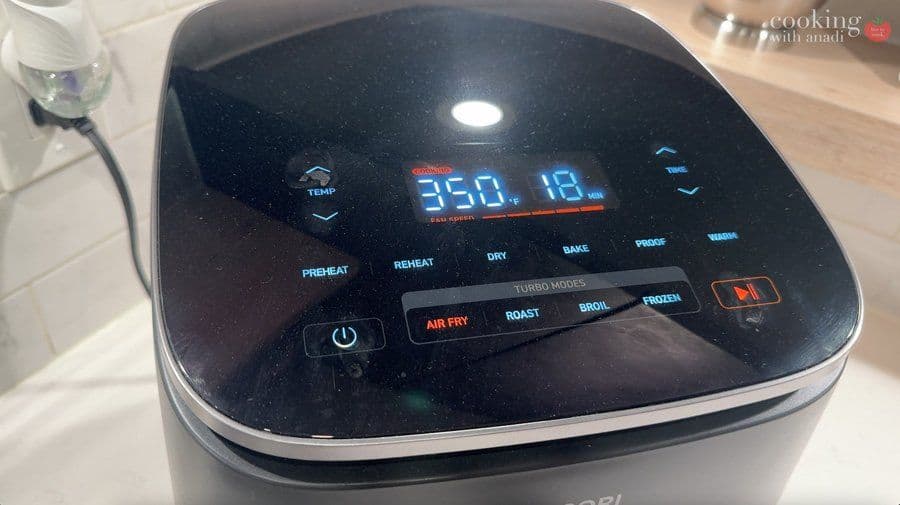
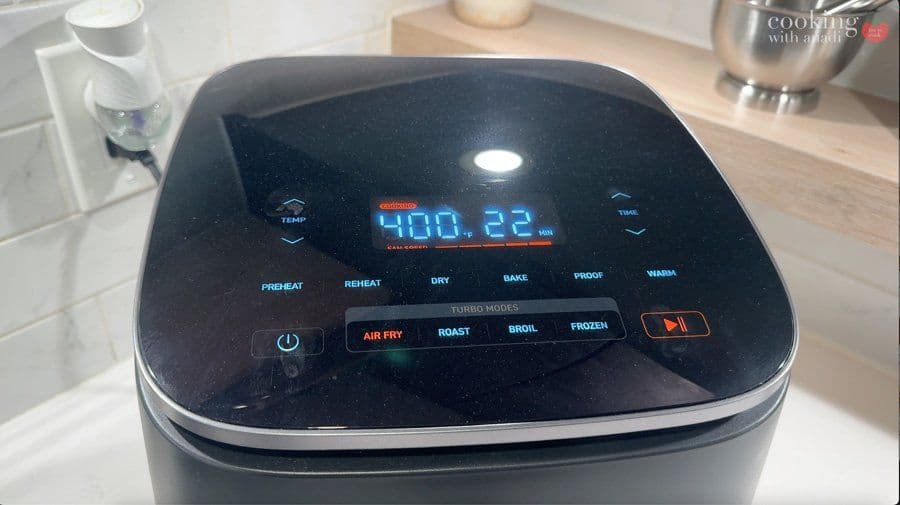
Preheat the air fryer to 350°F.
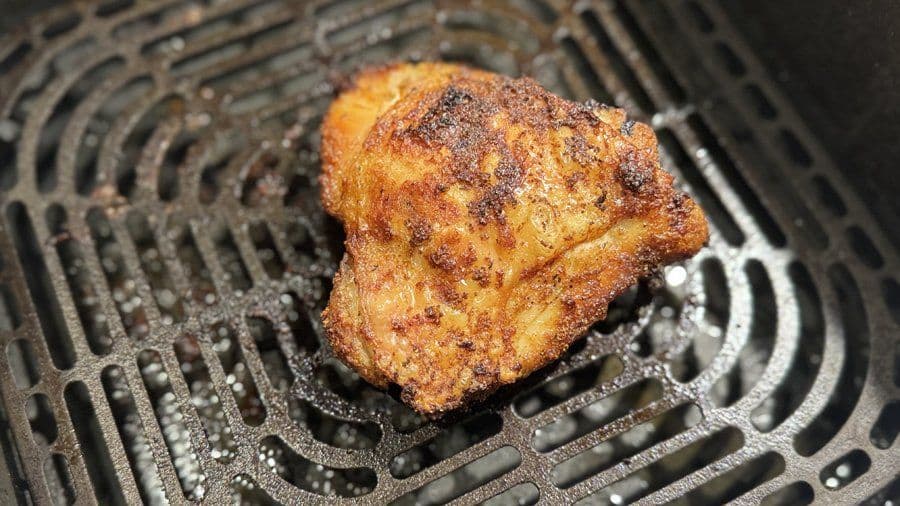
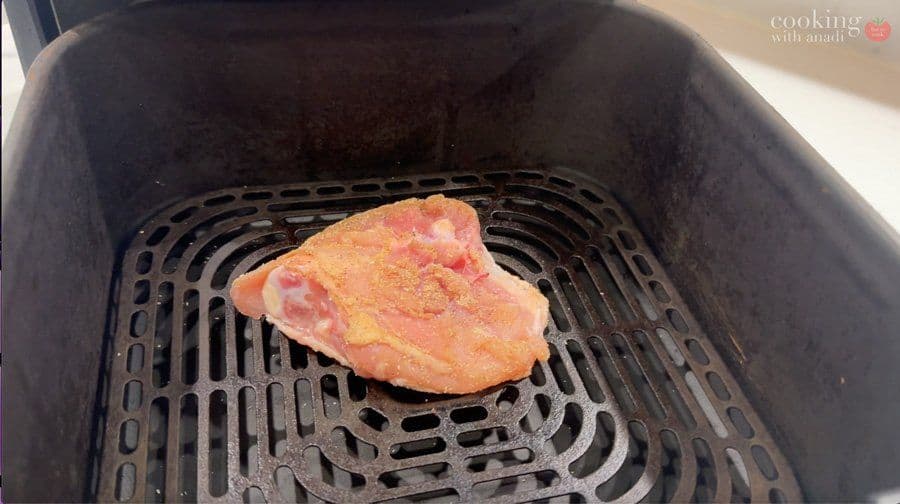
Place the thighs skin side down in the basket with space around it.
Cook for 18 minutes at 350°F to render the fat.
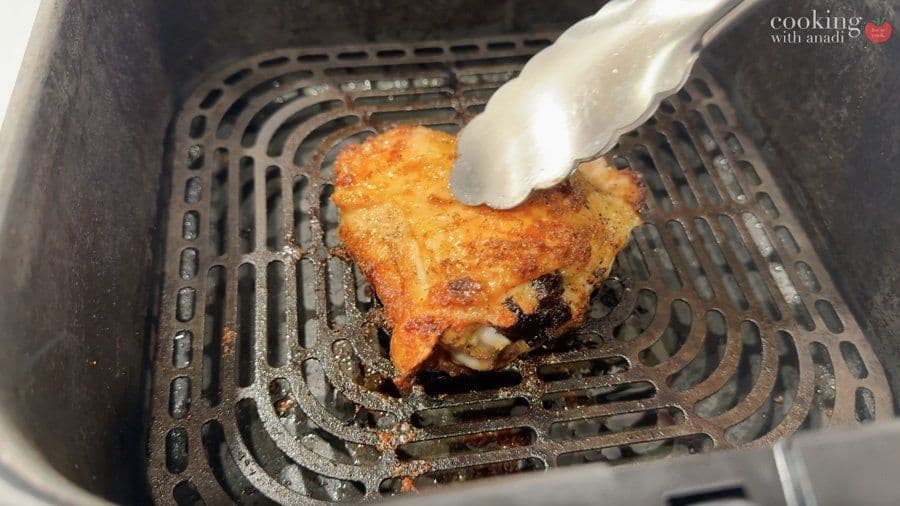
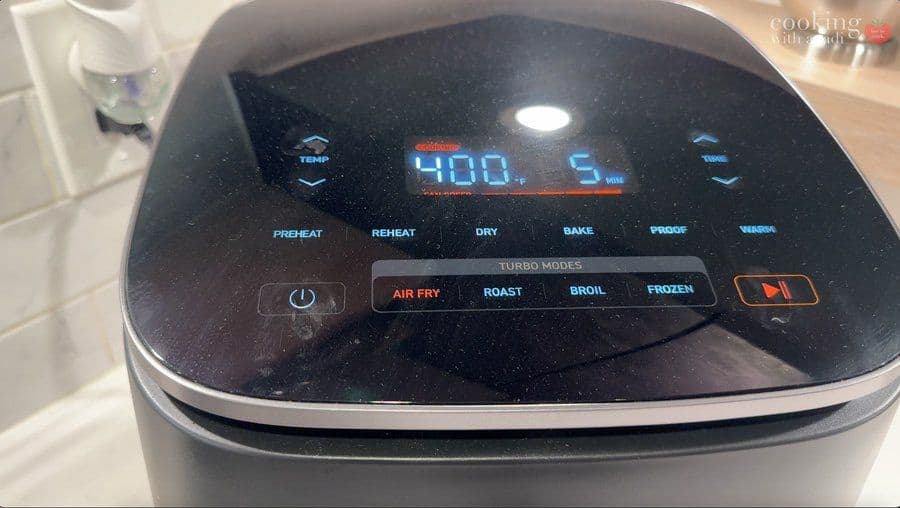
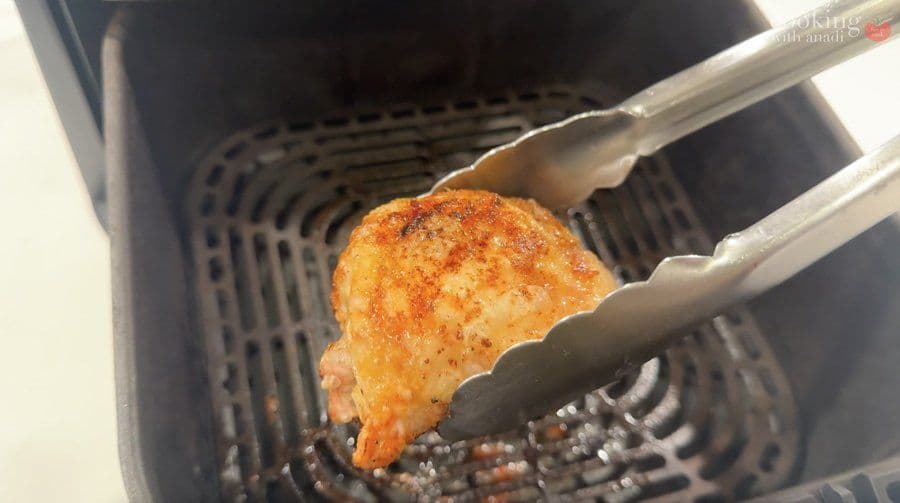
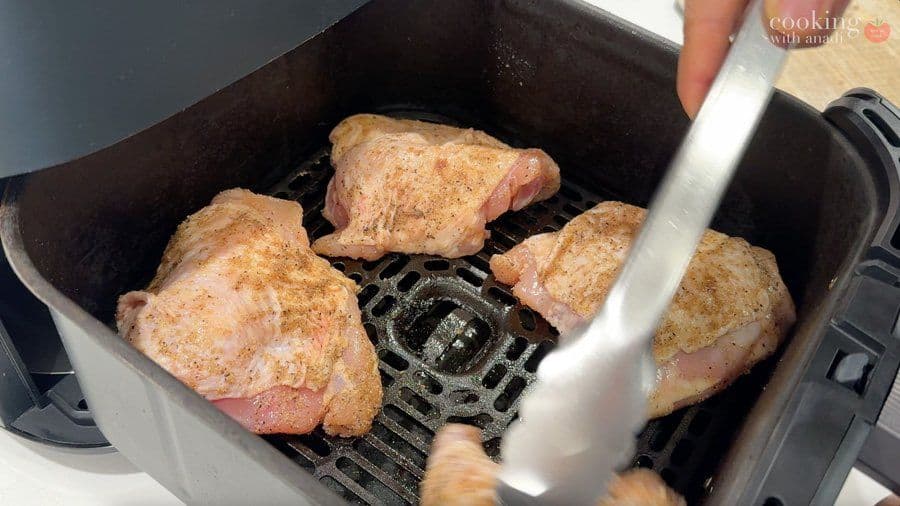
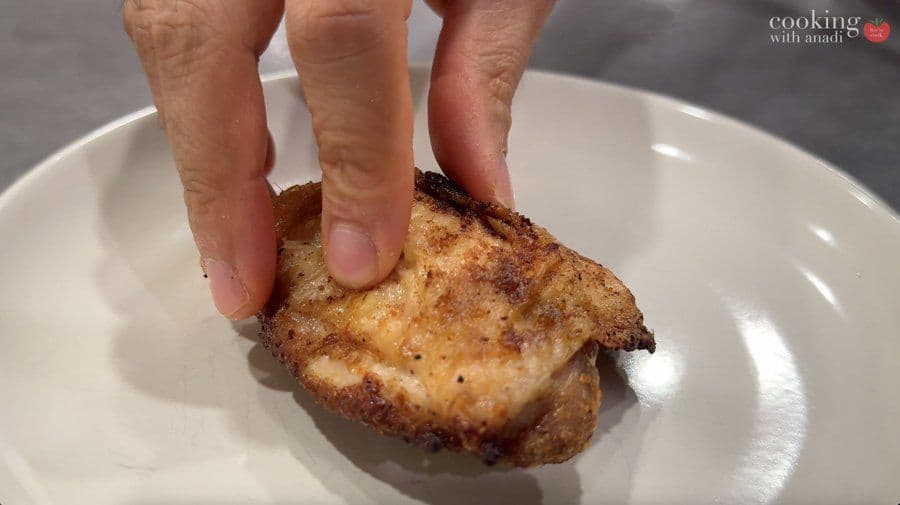
Flip skin side up, increase temperature to 400°F, and cook for 4–6 minutes until deeply golden and crispy and internal temperature reaches 165°F.
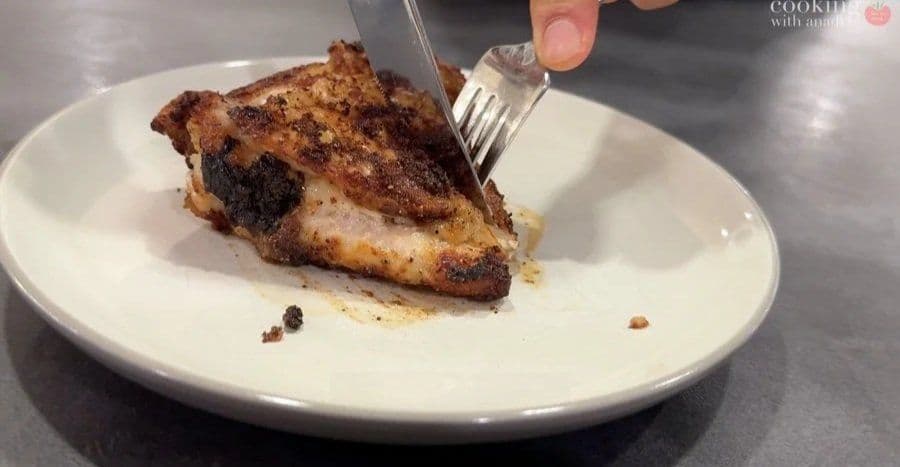
Rest uncovered for 5–7 minutes.
Serve and enjoy!
How Do I Know the Chicken Thighs Are Cooked?▼
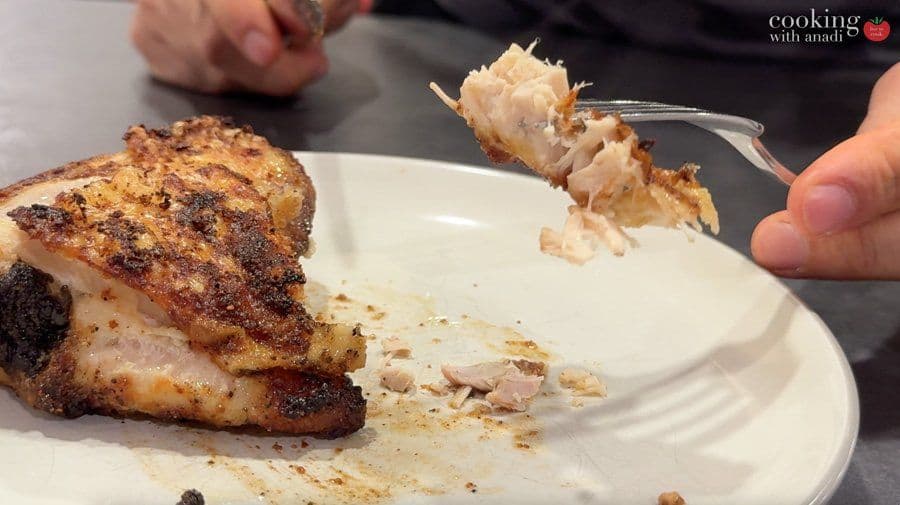
The chicken thighs are fully cooked when the inside is no longer pink. By following the recipe here, your chicken thighs will be fully cooked. However, if you want to be extra certain, then feel free to use a meat thermometer to measure the internal temperature of the chicken thighs. If you’re using a smart thermometer such as the one I recommend, then you’ll get a notification when it’s time to remove the chicken thighs from the air fryer so that you’re confident that the thighs are perfectly cooked! You’ll want to aim for an internal temperature of 165°F.
Common Mistakes and How to Fix Them!
Not Patting the Chicken Thighs Dry
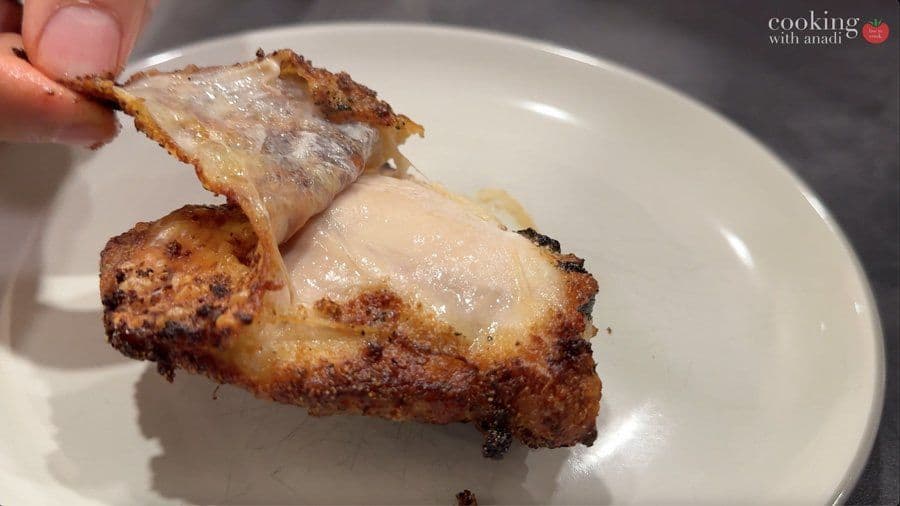
Moisture is always the enemy when it comes to air frying, and I say that for all of my recipes! Because there will be moisture on the chicken skin, that will need to cook off first before crisping can happen. Water boils at 100°C or 212°F, and then later on, at about 300°F, the Maillard reaction starts to brown the food and adds flavor. If there’s water to cook off, then this will delay the process, leaving you with a soggy, floppy, and sad skin! As a result, it’s really key to remove all the moisture by aggressively patting down your chicken thighs with paper towel. See what happens if you don’t in the photos below!
Overcrowding the Air Fryer Basket
I can understand if you want to meal prep chicken thighs or just make a lot for a crowd then you’ll want to just cook your thighs all together to “save time” and get it done! However, your air fryer basket can only take so much. If you overcrowd the air fryer basket, then the air flow won’t be able to properly circulate around the air fryer. As a result, that’s how you get soggy skin instead of crispy!
The solution is to ensure that you properly space out the chicken thighs and avoid them hugging each other. If you need to make a large number of chicken thighs, then ensure to cook them in batches so that the chicken thighs are spaced out appropriately based on the size of your air fryer basket. Yes, this seems time-consuming and tedious, but it’s worth it to prevent a botched batch of chicken thighs, right?
Air Frying at the Wrong Temperature
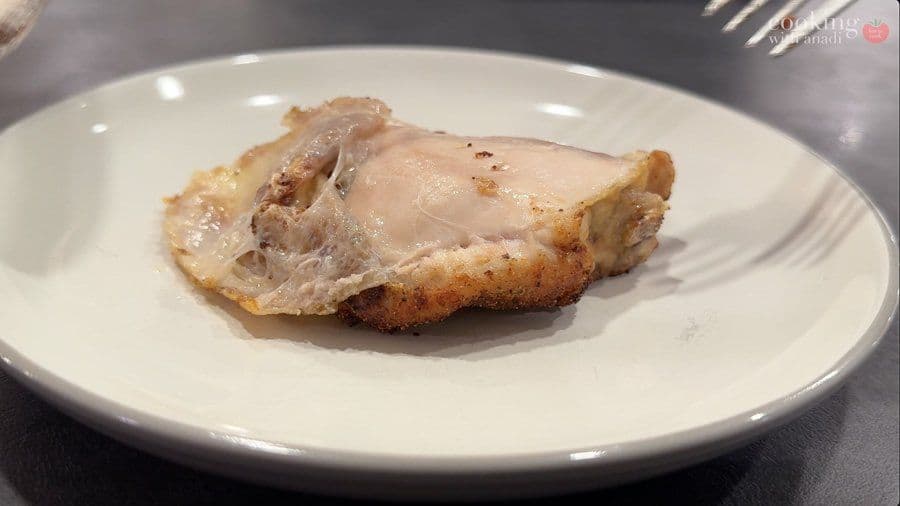
Ever heard online that you can just throw the chicken thighs in the air fryer at 400°F and it’ll air fry perfectly? Well, sorry to break it to you, but that’s a myth and it’s totally wrong! As you can see below, I cooked at 400°F blindly, and here’s the result - a chicken thigh that tastes decent since it was well-seasoned, but the skin is completely inedible because it’s so wet and soggy! The skin just flopped around!
Because chicken thighs with skin have lots of subcutaneous fat under the skin, we need to render that out first before getting the skin to a crisp golden brown.
As we’ll do in this recipe, we’ll be doing a two-stage cook. The first slow cook will render out the fat from the skin. Then, we’ll flip it over skin-side up to get the skin crisp for the remaining few minutes of the air frying time. Crisp and tastiness is guaranteed by following this method!
Do You Need to Flip The Chicken Thighs During Cooking?▼
Only flip the chicken thigh skin side up in the final couple of minutes of the 2-stage cook. We first cook the skin-on chicken thighs at a lower temperature, 350°F for about 18 minutes. This lower temperature allows the fat underneath the skin to slowly render out to essentially prepare it to get crisp in the 2nd stage of the cook. After the first 18 minutes, we flip the chicken skin side up, bump up the heat to 400°F and the skin can crisp.
What if I’m Using Skinless Thighs?▼
The process is very similar to skin-on thighs. The main difference is that you should flip the chicken halfway through cooking to ensure even browning, since ovens often have uneven heat zones.
Cook the thighs at 350°F for 18–20 minutes, then increase the heat to 400°F for the final few minutes to help develop some browning on the surface.
Cook until the internal temperature reaches 165°F.
Variations of Air Fryer Chicken Thighs
Chicken thighs really are a blank canvas, and there are tons of options for you to flavor them however you want to keep switching things up for a new flavor adventure every time! Here are my favorite spice blends for chicken thighs:
Simply transfer the cooked chicken thighs into an airtight container, and keep it in the fridge. You can keep cooked chicken in the fridge for about 3 to 4 days.
Freezing
If you can’t finish the chicken thighs in the 3 to 4 days or if you want to just make lots of chicken thighs to freeze them, then feel free to! The fact that these chicken thighs are freezer-friendly makes them perfect to meal prep. Store your cooked chicken thighs in the freezer for about 3 to 4 months to avoid the possibility of freezer burn developing.
Reheating
The air fryer is your best bet for reheating your chicken thighs! Mine conveniently has a “Reheat” setting, so simply place your chicken thighs in the basket and select that. Reheat for about 5 minutes or until the chicken thighs have completely warmed through.
You’ll get best results if you thaw the frozen chicken thighs overnight and then reheat. However, if you forgot to do this, then don’t worry! It happens to all of us! You can definitely use the air fryer to thaw the frozen chicken thighs, but keep in mind that the duration will take significantly longer since you’ll be thawing and reheating at the same time.
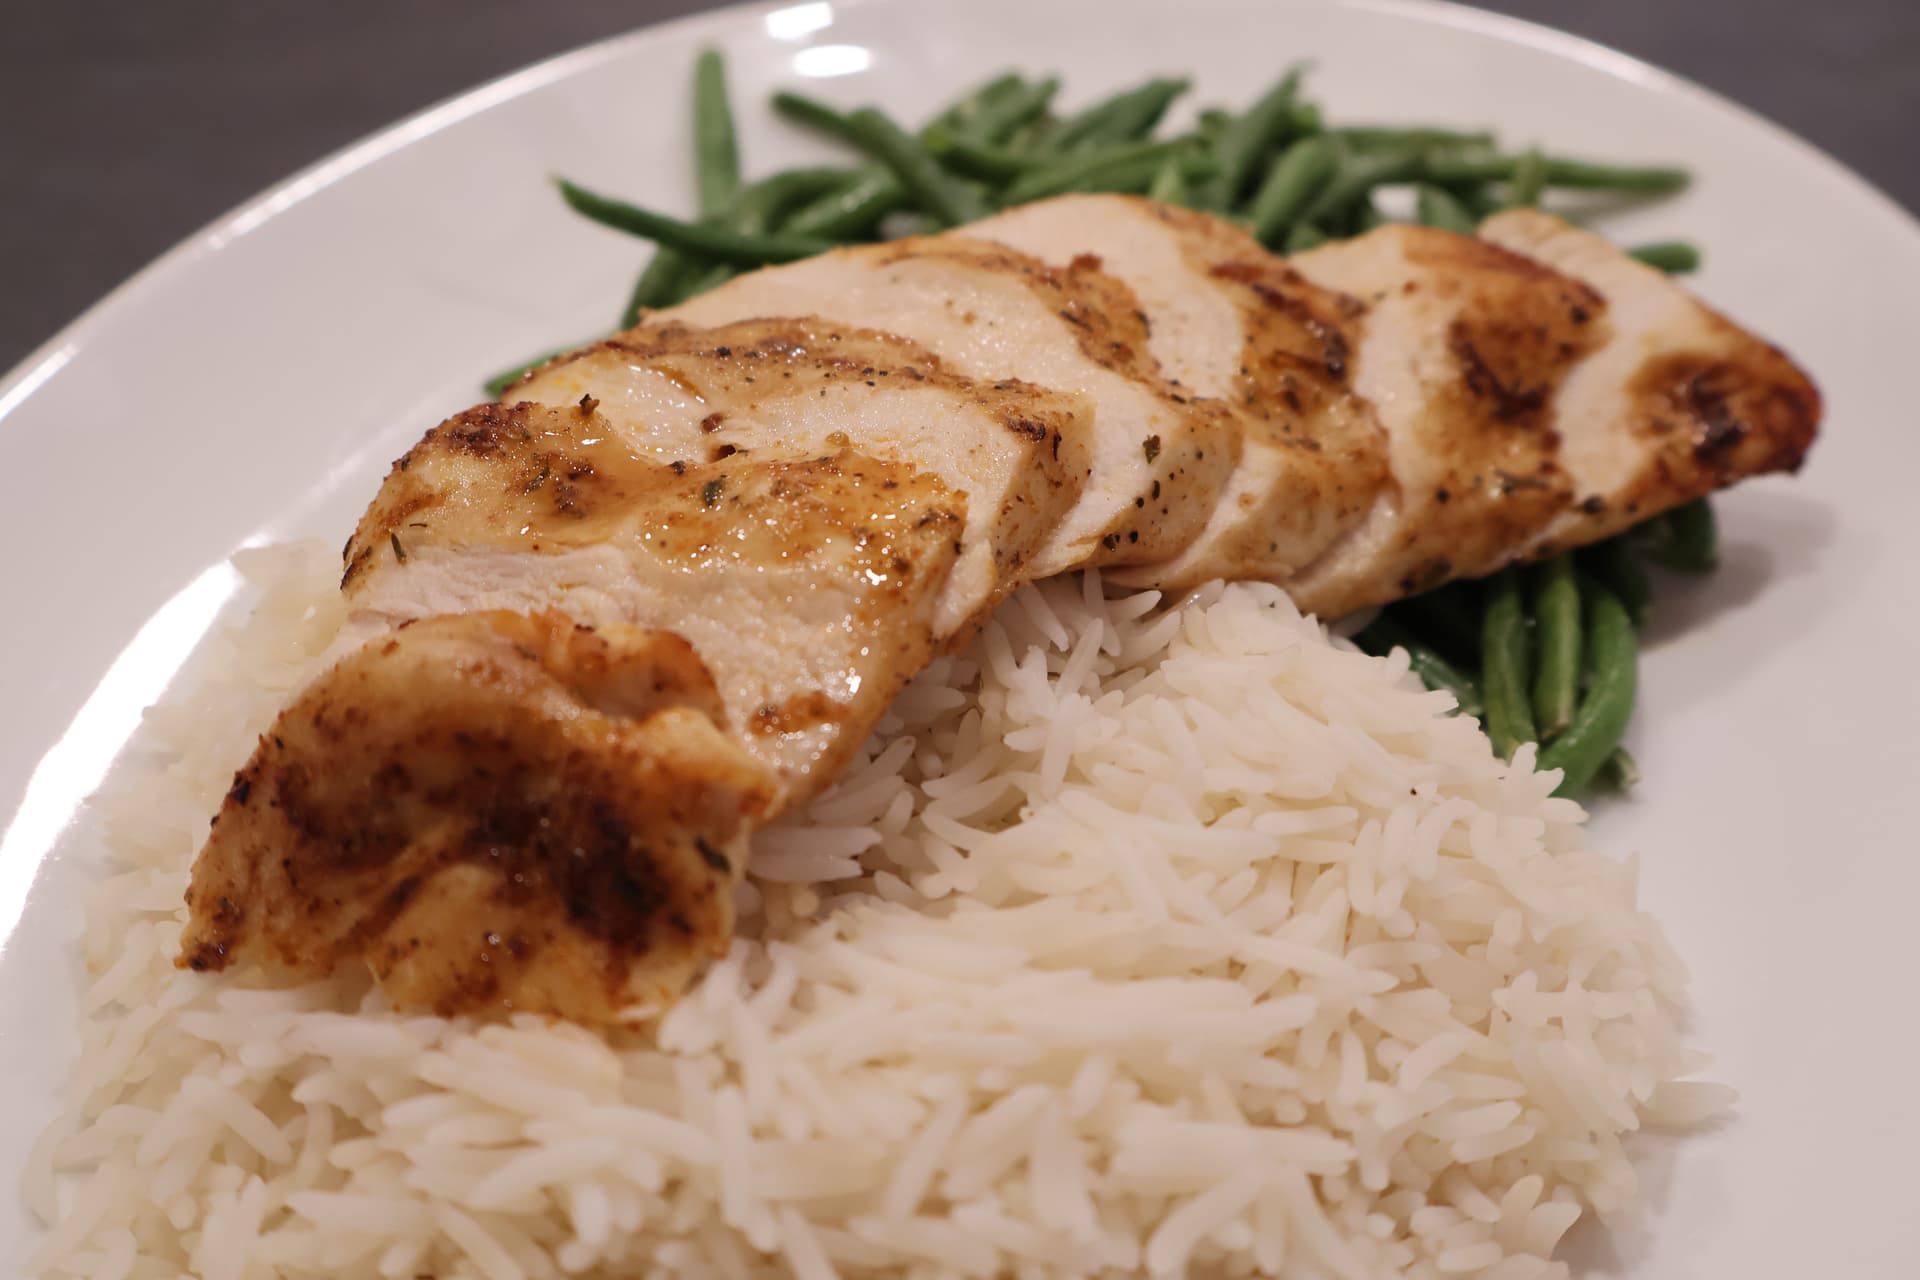
Best Ways to Serve Chicken Thighs
Chicken thighs are so delicious and you can have them in so many ways! Here are some ideas:
Let me know what you think of this recipe in the comments! If you’ve tried this recipe, be sure to post it on social media and tag it with #cookingwithanadi and mention me @cooking.with.anadi. Thank you!
Recipe by Anadi Misra
Super Crisp Air Fryer Chicken Thighs Recipe
Super crispy air fryer chicken thighs with juicy, tender meat inside. Quick, easy, and gluten-free, this foolproof recipe delivers perfect results every single time.
Pat the chicken thighs aggressively dry until the paper towel comes away completely dry.
Pat the chicken thighs aggressively dry until the paper towel comes away completely dry.
2
Season evenly with salt, pepper, garlic powder, and onion powder. Drizzle about 1 tsp oil over the skin and rub lightly to coat.
Season evenly with salt, pepper, garlic powder, and onion powder. Drizzle about 1 tsp oil over the skin and rub lightly to coat.
3
Preheat the air fryer to 350°F.
Preheat the air fryer to 350°F (177°C).
4
Place the thigh skin side down in the basket with space around it.
Place the thigh skin side down in the basket with space around it.
5
Cook for 18 minutes at 350°F to render the fat.
Cook for 18 minutes at 350°F (177°C) to render the fat.
6
Flip skin side up, increase temperature to 400°F, and cook for 4–6 minutes until deeply golden and crispy and internal temperature reaches 165°F.
Flip skin side up, increase temperature to 400°F (204°C), and cook for 4–6 minutes until deeply golden and crispy and internal temperature reaches 165°F (74°C).
7
Rest uncovered for 5–7 minutes.
Rest uncovered for 5–7 minutes.
Nutrition per serving
128
Calories
20g
Protein
0g
Carbs
5g
Fat
0g
Fiber
0g
Sugar
554mg
Sodium
Share This Recipe
Did you make this recipe? Tag @cooking.with.anadi on Instagram and hashtag it #cookingwithanadi
Tested & written in Anadi’s kitchen
Free weekly newsletter
Like this recipe? Get more every week.
New recipes, cooking tips, and behind-the-scenes from Anadi's kitchen.
Craving pizza without the guilt? This heart-healthy pizza recipe delivers all the cheesy, crispy satisfaction you love with better-for-you ingredients. Make it at home tonight!
1 hr 5 minHard3 pizzas
Recipe history
April 16, 2026 — Reworked and refreshed for the 2026 relaunch — new photography, restructured and standardized ingredients & instructions.
Quick, easy, and full of flavor — this pesto pasta with grilled chicken and peas is the perfect weeknight dinner. Ready in minutes with simple ingredients you already love.
Make the ultimate Ultra Cheesy Pizza Hut Stuffed Crust Pizza at home with gooey melted cheese sealed inside every golden, crispy bite. A crowd-pleasing copycat recipe the whole family will love.
Creamy, garlicky, and ready in no time, this tomato chicken pasta with cream cheese is the ultimate quick dinner. Rich, satisfying flavors the whole family will love.
Juicy, tender air fryer chicken breast ready in minutes. A foolproof gluten-free recipe perfect for busy weeknights. Crispy outside, moist inside — guaranteed results every time.
Juicy, tender sirloin steak made effortlessly in the air fryer. Get a perfect sear every time with this quick, gluten-free recipe that delivers steakhouse results right at home.
17 minMedium2 steaks
Tongs
Check on Amazon →
Comments
No comments yet — be the first to share your thoughts!
Leave a review
Be the first to share how it went — your note helps other cooks (and earns the recipe its stars).


Comments
No comments yet — be the first to share your thoughts!
Leave a review
Be the first to share how it went — your note helps other cooks (and earns the recipe its stars).