


This post may contain affiliate links. Read our disclosure policy
Watch the recipe

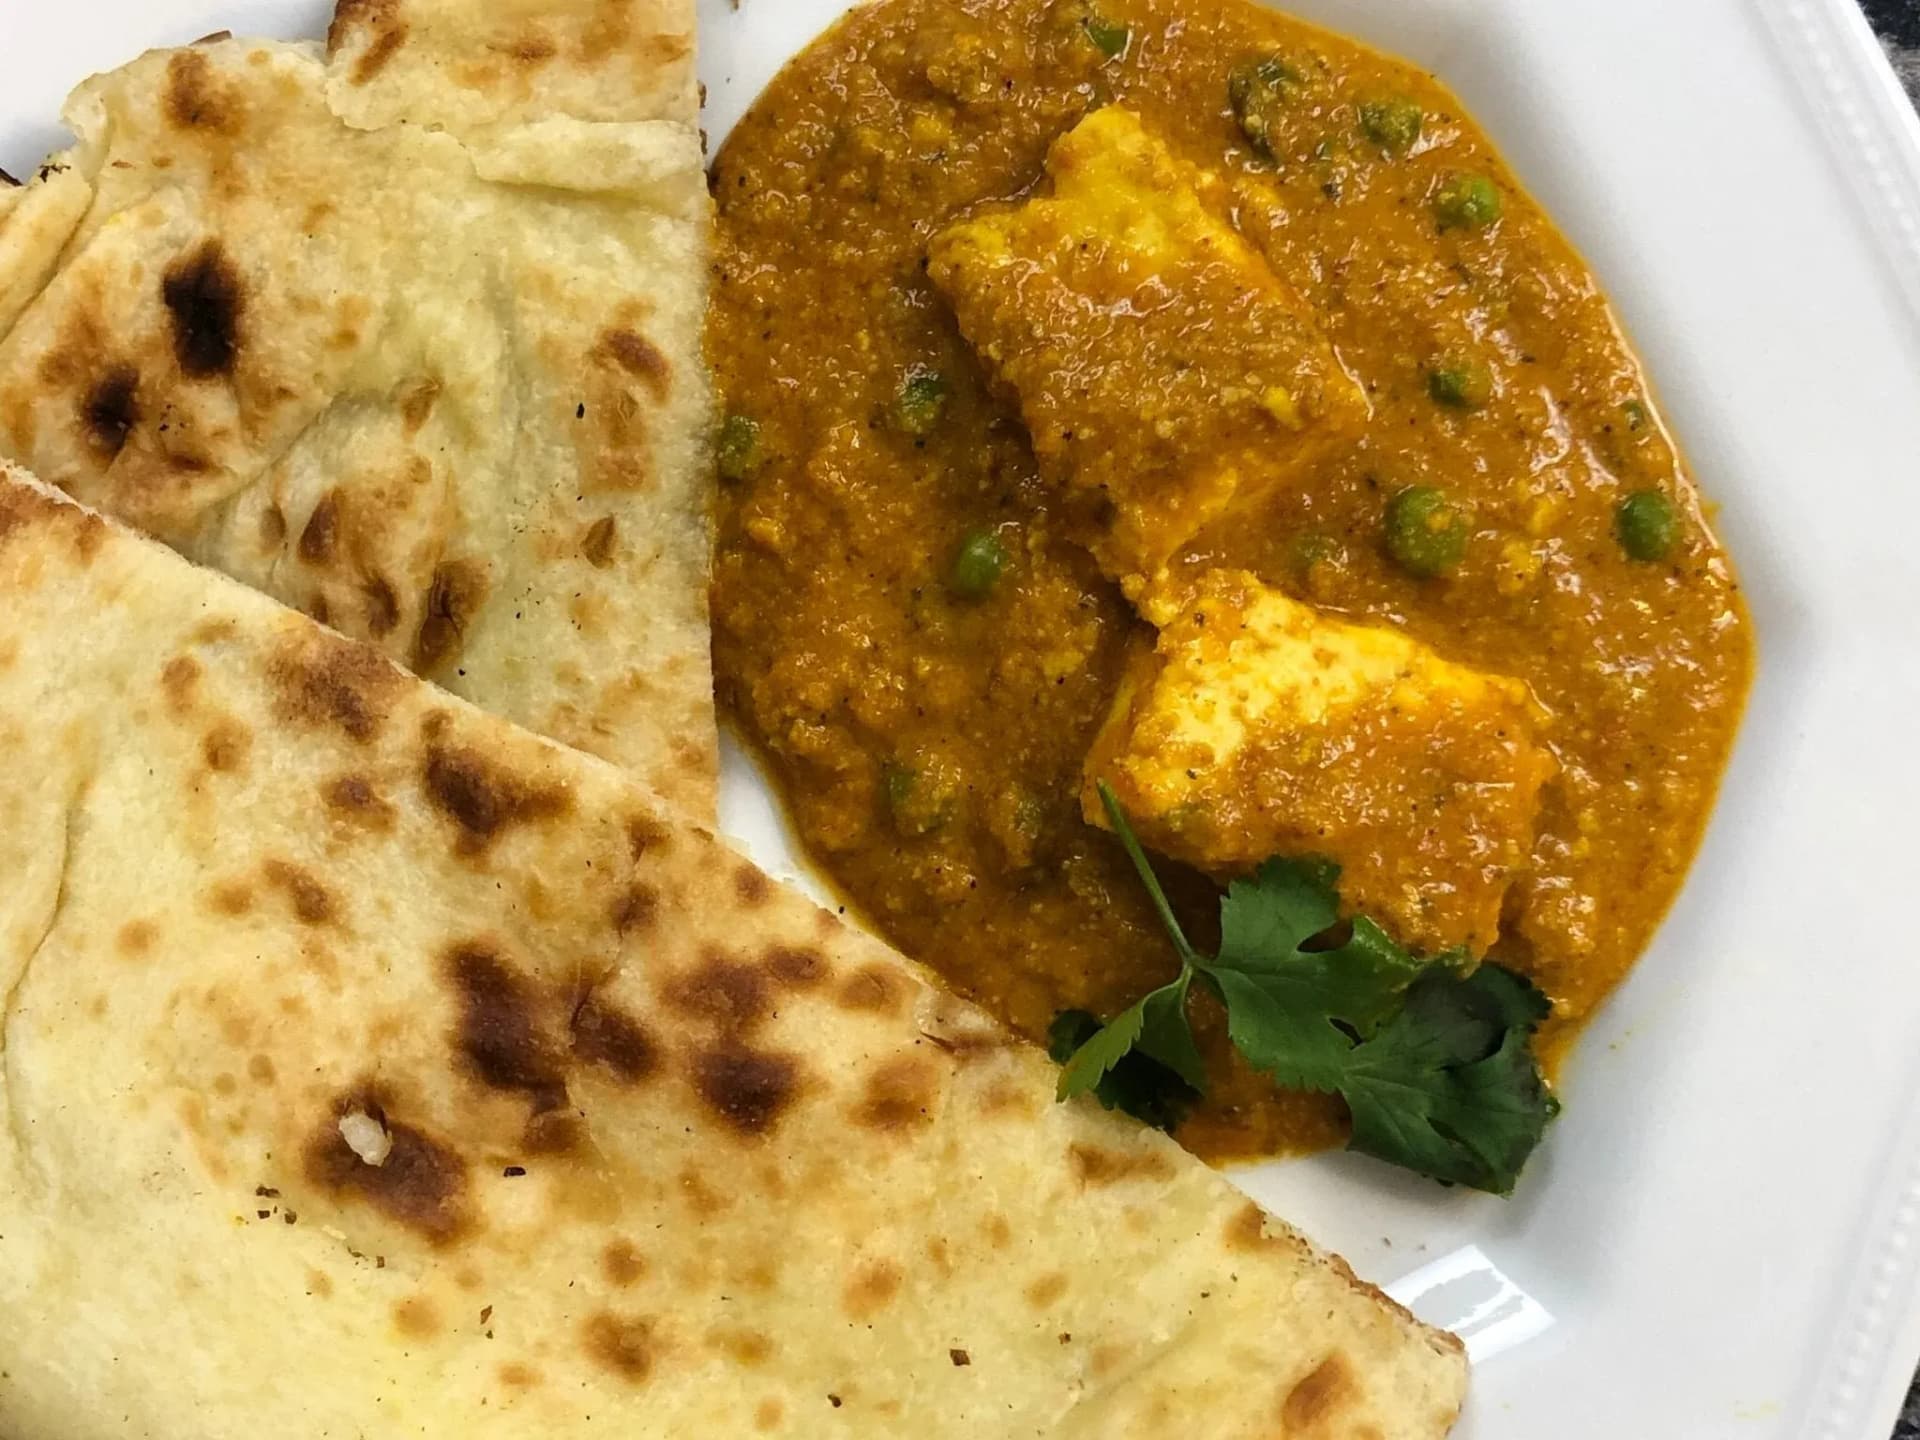
I’ll be sharing one of my top three favorite paneer recipes! Of course, Mughlai-Style Paneer Makhani is king for me, but I’d hold this tied for second alongside Kadai Paneer. Who doesn’t love paneer? Paneer translates to “Indian cottage cheese.” However, as I always disclaim in my paneer recipes, I really wouldn’t recommend you substitute paneer with actual cottage cheese! Please don’t do that! I took the translation literally when I first came to Canada. I wasn’t able to find paneer at my local grocery store, so I did in fact “substitute” with real cottage cheese to make paneer makhani. Well, you can imagine how that turned out… A huge disappointment!!
Anyhow, paneer is a popular and versatile Indian protein source, similar to tofu. It doesn’t have that much flavor on its own, but it sure acts as a fabulous blank canvas! You can typically find paneer at your local South Asian or Indian grocery store. Otherwise, you can feel free to make your own Fresh Homemade Paneer! Let me tell you that while it may seem like a bit of work, it’s well worth it! Fresh paneer is so soft and absorbs your curry amazingly well!
If you’re looking to switch up your protein then be sure to keep reading on! For vegetarians and non-vegetarians, this paneer curry is sure to be a delight. What’s amazing about this recipe is that everything comes together in one-pot. Even if you’re looking for a comforting dinner on a weeknight, there’s no reason not to indulge in this incredible paneer dish! Pair with simple basmati rice, naan bread, or rumali roti, and you’ve got an exquisite Indian feast ready in no time! This dish is absolutely perfect for winter! So let’s get started!
About This Matar Paneer Recipe
Matar paneer translates to “peas and paneer” curry. Peas are actually my favorite green veggie! I like to have peas with my Potato Brunch Rolls and my homemade samosas. I like peas because they’re a very sweet and delicious veggie!
Even if you or someone in your family is the pickiest of eater and isn’t a fan of green peas, I challenge you to try this recipe. This luscious gravy combined with the soft paneer and a serving of bread or rice will make you fall in love with peas! The peas will add some nice texture to this curry, and you’ll be gobbling them up!
This paneer and peas curry can be prepared homestyle or restaurant-style. This recipe is inspired by restaurant recipes. My mom made this on occasion but it just wasn’t the same, no offense to my mom! When I like to make my dishes, I love to recreate the intense and bold flavors from the restaurant! I’ve had some scrumptious paneer with peas curry back in Delhi, and I’d say this is darn close to what I used to enjoy in my childhood!
I’d say that part of the richness and creaminess of this paneer dish comes from the cashews. I’ll be making a smooth cashew paste that adds incredible flavor to our curry.
For the peas, you can use fresh or frozen. For the sake of convenience, I’m using frozen peas, but feel free to use fresh peas if you’d like. If using frozen peas, ensure they have completely thawed before cooking. For fresh peas, make sure you’ve cooked them prior.
Tips for an Excellent Restaurant-Style Paneer and Peas Curry
- As an optional step, soak the cashews in warm/hot water for 30 minutes before pureeing. This will add additional flavor to the cashews
- Be sure to cook the masala (onion, ginger-garlic puree and tomatoes) well. This is the base of the dish and it's important that it is well cooked.
- The masala is cooked when the mixture has most of its moisture cooked out and it slides around the pan easily. Based on the amount of oil used while cooking, you may also notice oil released on the sides of the masala.
- If you notice the masala getting stuck on the pan, add water as soon as possible and scrape clean the pan. Continue cooking and monitoring.
- While creating the gravy, add more water than needed. Once the gravy has simmered to bring the flavors together, the consistency will be just right.
- The gravy without the cream is tasty enough that if you choose not to use cream today, you can still enjoy a yummy dinner. Enjoy!
Tools Needed
Ingredients for Paneer and Peas Curry
This restaurant-style paneer dish uses a few staple ingredients. Let’s review what you’ll need to prepare this mouthwatering curry!
- Paneer: I’m using homemade paneer.
- Peas
- Onions
- Tomatoes
- Ghee or olive oil
- Cloves
- Cumin seeds
- Ginger-garlic paste
- Bay leaf
- Turmeric
- Green cardamom pods
- Cinnamon sticks
- Deggi mirch
- Cashews
- Garam masala
- Dried fenugreek leaves/kasoori methi
- Water, as needed
- Peas, fresh or frozen
- Cream
How to Prepare This Matar Paneer Restaurant Style Recipe
- Add onion, ginger and garlic to a food processor, puree until smooth with the help of a bit of water. Set aside.
- Add tomatoes to same food processor, puree until smooth. Set aside.
- Add cashews to same food processor, puree until smooth with the help of a bit of water.
- Heat a pan/wok on medium heat and add ghee. Add all the whole spices and cook until aromatic, about 30 seconds.
- Add onion, ginger and garlic paste and mix well.
- Add turmeric, deggi mirch and ground coriander. Stir well and cook this “masala” until dry. Most of the moisture should evaporate. If the masala starts to stick at the bottom, add water and clean the bottom of the pan and continue cooking.
- Add pureed tomatoes and bring up to a simmer. Add salt to taste and continue cooking with the lid on.
- Stir well and cook until the masala is dry. Most of the moisture should evaporate. If the masala starts to stick at the bottom, add water and clean the bottom of the pan and continue cooking.
- Add cashew paste and cook for 1-2 minutes.
- Then add the cubed paneer and mix well in the masala, add the peas as well and mix well. Cook for 1-2 more minutes.
- Add enough water to create a gravy and bring up to a simmer. Finish with garam masala, kasoori methi and cream. Serve with roti/naan/paratha/rice.
Frequently Asked Questions
What is matar paneer?▼
Matar paneer is a beloved North Indian curry of soft paneer and green peas (matar) in a rich, spiced tomato-cashew gravy — a vegetarian restaurant classic.
Can I use frozen peas for matar paneer?▼
Yes — fresh or frozen both work (the recipe calls for either). Frozen peas go straight in with the paneer; no need to thaw.
How do I keep the paneer soft in the curry?▼
Add the paneer toward the end and simmer it only briefly — overcooking makes it rubbery. For extra-soft cubes, soak them in warm water for a few minutes before adding.
What gives matar paneer its rich, restaurant-style gravy?▼
A smooth cashew paste blended into the spiced tomato-onion base, finished with garam masala, kasoori methi, and a touch of cream — that’s the secret to the velvety restaurant texture.
This Is Not Paneer Butter Masala
Matar paneer, or mutter paneer if you have seen it written that way, is one of the most popular paneer dishes on any North Indian menu, and it sits right next to paneer butter masala on almost every one of them. They are not the same dish and mine is deliberately the lighter of the two. There is no butter in this recipe at all, and no heavy cream either. The richness comes from an eighth of a cup of cashews blended into a smooth paste, and the finish is 10% half and half rather than cream.
There is no tomato paste in this gravy either. Two medium tomatoes go into the blender and get cooked down until the masala is dry, which is a slower route than a spoonful of paste but it is what gives the sauce its fresh, slightly sweet edge. You will not find yogurt in here, and you will not find green chilies. All of the heat and all of that restaurant red color come from two teaspoons of deggi mirch, which is a mild red chili powder ground for color more than fire. If you cannot find it, a teaspoon of Kashmiri chili powder gets you the same vibrant red with a touch more heat, and sweet paprika is the closest match if you want it milder still.
Why the Paneer Stays Soft
A lot of matar paneer recipes tell you to pan-fry the paneer cubes in a little oil before they go into the sauce. Mine does not. The 175 grams of cubed paneer goes into the finished masala raw and cooks for one to two minutes, just long enough to warm through and take on the spices. That is the whole reason it stays soft. Frying paneer sets the surface and squeezes water out of it, and once that happens even a long simmer in the gravy will not undo the chewy texture.
This is also a stovetop recipe from start to finish. There is no Instant Pot step, no sauté button, no pressure cooking and no natural release anywhere in it. Everything happens in one pan on medium heat, and the only thing that takes patience is cooking the masala until it goes dry. If you want to make it without dairy, extra firm tofu pressed well swaps in for the paneer and olive oil stands in for the ghee. The cashew paste is already doing most of the enriching work, so the cream at the end is the only piece you would need to think about.
The Spice Order, the Blender and the Gravy
The order the spices go in is what separates a flat matar paneer from a restaurant one. Whole spices go into the hot ghee first and cook for about thirty seconds until they smell aromatic: a bay leaf, two cloves, two green cardamom pods, half a teaspoon of cumin seeds and half an inch of cinnamon. Ground spices come later and only after the onion paste is in the pan, because they burn in seconds in bare fat. That second round is half a teaspoon of turmeric powder, two teaspoons of deggi mirch and one teaspoon of coriander powder.
The blender does three separate jobs and it is worth doing them in this order so you only wash it once at the end. First the onion, ginger and garlic, ground with a splash of water into a smooth paste. Then the tomatoes on their own. Then the cashews, again with a little water. Each one goes into the pan at a different moment, and the cashew paste is the last of the three, cooked for a minute or two before the paneer and peas join it.
The gravy itself is built backwards from most curries. You cook the masala until it is dry, twice, and only then add enough water to bring it back to the thick gravy you want. Adding the water early is how you end up with something thin and raw-tasting. Finish off the heat with half a teaspoon of garam masala, two teaspoons of kasuri methi crushed between your palms, and the cream. Serve it with roti, tandoori roti, naan, paratha or plain basmati rice. Leftovers keep well in the fridge and the gravy thickens overnight, so loosen it with a splash of warm water when you reheat it the next day.
A Quick Reference for the Measurements
If you are scanning rather than reading, here is what actually goes into the pan. Whole spices first, bloomed in two tablespoons of ghee: a bay leaf, two cloves, two green cardamom pods, half a teaspoon cumin seeds and half an inch cinnamon stick. Note that it is ghee and not tablespoons oil. Olive oil will work, but you lose the nuttiness that makes this taste like a restaurant kitchen. The ground spices go in after the onion paste and consist of half a teaspoon turmeric powder, two teaspoons deggi mirch and one teaspoon coriander powder.
Two things people expect to see and will not find are a fixed teaspoon salt measure and a set number of cups water. Salt goes in to taste while the tomatoes simmer, and water is added a little at a time until the gravy is as thick as you want it. A taste test at that point is more reliable than any number I could give you, because tomatoes vary so much in acidity. The full printable recipe card at the bottom of this post has every quantity in one place and scales if you are cooking for more than four.
A few smaller notes. I use half a medium onion rather than a large onion, because the cashew paste is already carrying plenty of body. The peas are half a cup of fresh green peas, though frozen work just as well straight from the bag. When you blend, do the onion, ginger and garlic first, then the tomatoes, then the cashews, and grind each one down properly. And low heat matters at exactly one moment, which is after the cream goes in, because a hard boil at that stage can split it.
Matar paneer is a north india staple, and it is one of the easier restaurant curries to turn vegan: swap the ghee for oil, the paneer for extra firm tofu, and leave out the cream. Whichever way you make it, the thing to protect is the paneer. Overcooking is what turns paneer chewy, and there is no pressure cooker step in this recipe at all, no high pressure setting and no sauté button, precisely because a pan on the stove gives you the control to pull it off the heat at the right moment.
Let me know what you think of this recipe in the comments! If you’ve tried this recipe, be sure to post it on social media and tag it with #cookingwithanadi and mention me @cooking.with.anadi. Thank you!
Recipe by Anadi Misra
Make restaurant-style Matar Paneer at home with this classic Indian recipe. Tender paneer and peas in a rich, spiced tomato gravy — the perfect vegetarian dinner the whole family will love.
Stovetop
Rate this recipe ✦
10 min
Prep
35 min
Cook
45 min
Total
4
servings
medium
Level
Ingredients
Ingredients
Tap any quantity to scale
For the masala base
- (30 ml) ghee · make your ownShop →
- bay leafShop →
- clovesShop →
- green cardamom podsShop →
- (1 g) cumin seedsShop →
- (1.3 cm) cinnamon sticksShop →
- onion(roughly diced)
- (8 g) ginger-garlic paste · make your own
- (1 g) turmericShop →
- (5 g) deggi mirchShop →
- (3 g) ground corianderShop →
- medium tomatoesShop →
- (16 g) cashewsShop →
- salt(to taste)Shop →
To finish the curry
- (175 g) paneer (cubed) · make your own
- (75 g) fresh/frozen peas
- (1 g) garam masalaShop →
- (5 g) dried fenugreek leavesShop →
- 10% half and half cream
- water(as needed)
Instructions
- 1
Add onion, ginger and garlic to a food processor, puree until smooth with the help of a bit of water. Set aside.
Add onion, ginger and garlic to a food processor, puree until smooth with the help of a bit of water. Set aside.
- 2
Add tomatoes to same food processor, puree until smooth. Set aside.
Add tomatoes to same food processor, puree until smooth. Set aside.
- 3
Add cashews to same food processor, puree until smooth with the help of a bit of water.
Add cashews to same food processor, puree until smooth with the help of a bit of water.
- 4
Heat a pan/wok on medium heat and add ghee. Add all the whole spices and cook until aromatic, about 30 seconds.
Heat a pan/wok on medium heat and add ghee. Add all the whole spices and cook until aromatic, about 30 seconds.
Learn the technique - 5
Add onion, ginger and garlic paste and mix well.
Add onion, ginger and garlic paste and mix well.
- 6
Add turmeric, deggi mirch and ground coriander. Stir well and cook this “masala” until dry. Most of the moisture should evaporate. If the masala starts to stick at the bottom, add water and clean the bottom of the pan and continue cooking.
Add turmeric, deggi mirch and ground coriander. Stir well and cook this “masala” until dry. Most of the moisture should evaporate. If the masala starts to stick at the bottom, add water and clean the bottom of the pan and continue cooking.
- 7
Add pureed tomatoes and bring up to a simmer. Add salt to taste and continue cooking with the lid on.
Add pureed tomatoes and bring up to a simmer. Add salt to taste and continue cooking with the lid on.
- 8
Stir well and cook the masala until dry. Most of the moisture should evaporate. If the masala starts to stick at the bottom, add water and clean the bottom of the pan and continue cooking.
Stir well and cook the masala until dry. Most of the moisture should evaporate. If the masala starts to stick at the bottom, add water and clean the bottom of the pan and continue cooking.
- 9
Add cashew paste and cook for 1-2 minutes.
Add cashew paste and cook for 1-2 minutes.
- 10
Then add the cubed paneer and mix well in the masala, add the peas as well and mix well. Cook for 1-2 more minutes.
Then add the cubed paneer and mix well in the masala, add the peas as well and mix well. Cook for 1-2 more minutes.
- 11
Add enough water to create a gravy and bring up to a simmer. Finish with garam masala, kasoori methi and cream. Serve with roti/naan/paratha/rice.
Add enough water to create a gravy and bring up to a simmer. Finish with garam masala, kasoori methi and cream. Serve with roti/naan/paratha/rice.
Did you make this recipe? Tag @cooking.with.anadi on Instagram and hashtag it #cookingwithanadi

Tested & written in Anadi’s kitchen
Recipe history
- April 16, 2026 — Reworked and refreshed for the 2026 relaunch — new photography, restructured and standardized ingredients & instructions.
Filed under
Part of
You might also like

Authentic Kadai Paneer Recipe for a Restaurant-Style Delight
Make restaurant-style Kadai Paneer at home with bold spices, tender paneer, and a rich, aromatic gravy. An easy homemade recipe that delivers authentic Indian flavors every time.

Easy Authentic Paneer Tikka Masala Recipe
Make restaurant-quality Paneer Tikka Masala at home with this easy, authentic recipe. Smoky grilled paneer in a rich, creamy tomato sauce makes the perfect vegetarian Indian dinner.
Delicious Shahi Paneer Recipe for a Royal Dining Experience
Indulge in a creamy, restaurant-style Shahi Paneer made right at home. This rich Indian vegetarian recipe is perfect for an impressive dinner that feels truly royal.

Experience Royalty With This Paneer Butter Masala Recipe
Creamy, rich, and fit for royalty, this authentic Paneer Butter Masala recipe brings homemade Indian comfort food to your table. A vegetarian dinner the whole family will love.

Indulge in Royalty with this Luxurious Paneer Makhani Recipe
Rich, creamy, and utterly indulgent — this homemade Paneer Makhani recipe brings authentic Indian royalty to your kitchen. Tender paneer in a velvety Makhani sauce will leave everyone wanting more.
Super Easy Homestyle Indian Palak Paneer Recipe
Make creamy, homestyle Palak Paneer from scratch with this super easy Indian recipe. Fresh spinach, soft paneer, and bold spices come together for an authentic, comforting meal anyone can make.


Comments
No comments yet — be the first to share your thoughts!
Leave a review
Be the first to share how it went — your note helps other cooks (and earns the recipe its stars).